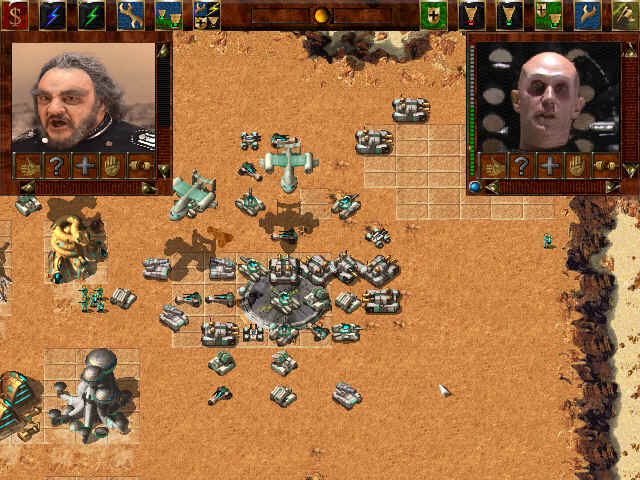
Dune III Interface:
Interface
Dune III should concentrate on the use of the mouse pointer. Every command should be accessed via the mouse controller or pointer. From this point, for the sake of clarity, let's pretend the game already exists and this is a document giving a quick summary of this "game's" interface.
The interface follows standards whenever possible- i.e. - Lassoing units, clicking on units, clicking on buildings (to access their capabilities and menus), giving movement orders, and of course pressing icons and buttons.
The command bar accesses many commands and menus for command and control.
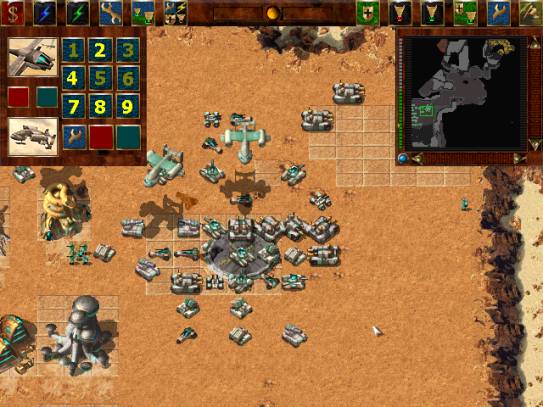
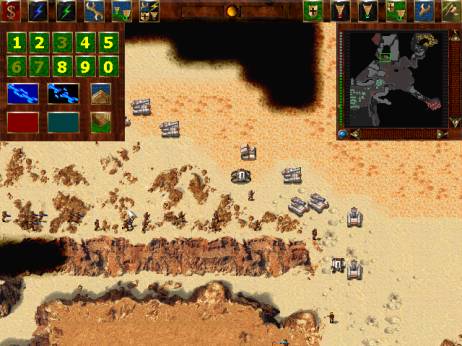
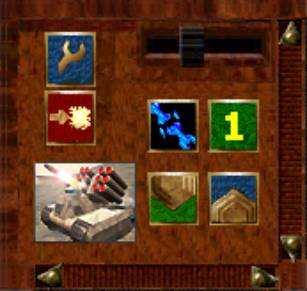
The Command Bar
![]()
From left to right they are the 1-Solari, 2-Aircorp, 3-Groundcorp, 4-Repair (by Repair Pad), 5- Air Transport, 6-Attributes, 7-Left Minimap Control, 8-Communication (Dune icon), 9-Left Minimap, 10-Guard, 11-Waypoint Formation Move, 12-Waypoint Travel Move, 13-Guard/Patrol, 14-Repair (by personnel), and 15-Rally.

Solaris Icon
The Solari is the common currency accepted for all debts public and private. The currency is backed by the value of the spice melange as well as the historical values of gold, gems, goods and services.
Spice is accepted as cash on all but the most remote planets. It is especially coveted by the Free Traders and CHOAM. Smugglers and mercenaries risk their lives on Arrakis every day for the spice.
When you begin a mission, you will start out with a set amount of Solari in which to set up your base of operations. Once you begin mining operations on Arrakis, you will earn more solari by mining the spice. Use this to purchase additional units and buildings.
Now, should you decide to sell a building, click the solari icon and then click on the building or wall you wish to salvage for currency.
To salvage a unit (not personnel) you must either move them to a starport to sell (or give) to another current player or move onto a repair pad. By clicking solari icon, then clicking a sale able unit, the unit will automatically move to a repair pad.
Keep in mind that the salvage value is no where near the purchase price you may of paid for a unit or building.
You may even sale units to your enemies if you feel you really need the money and your enemy really wants them, but keep in mind that your enemy may chose to salvage what you sell them and will then be able to build that unit type from then on. Keep this in mind when selling sonic, deviator, devastator, or any other tanks. You may set these prices.
You may also purchase or sale information, bribe, and give (solari). The idea of inter-character commerce is implemented in the game.

Air Corp Icon
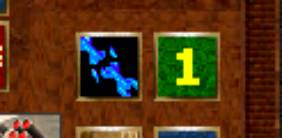
This icon will bring up your Air Corp command minimap. It allows you to set attributes for your carryalls and control your ornithopter strikes. In illustration below it is shown in the left minimap.
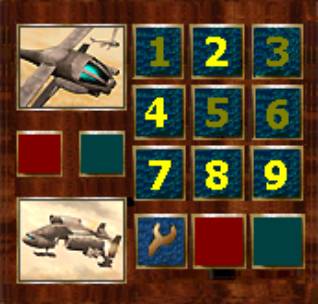
Air Corp Menu
The menu's first set of buttons consists of nine group icons, numbered one through nine. If a particular buttons number is yellow, it means that this group of three ornithopters is set to go on mission. If a buttons number is green-gold, it means that this group of three is available for missions. If a buttons group number is red, it means that that group is on mission. If there is no button or buttons it means that you have not yet acquired any or that group of ornithopters.
Now note the red and green buttons under the ornithopter picture. First the green button. Normally, to send a group on mission, you just pick an available group button, click it yellow, click it green, and then click on the target. However, if you wish to send a coordinated mass attack, press each group icon to yellow and pick a target('s) for each selection, then when you have the groups set the way you want, press the green button to launch all these groups at once.
Second, the red button. If you have units on mission, pressing the red button will abort and have them return to hiding immediately. It will also reset the icons to green-gold (standing by) when all units have disengaged and returned to hiding.
The carryall is a special air unit that can transport spice harvesters and other units quickly from place to place. Each carryall can carry one space harvester, one vehicle or five infantry units.
Carryall Menu Detail
The repair button will toggles on and off the carryalls automatic attribute to carry units to repair pads. There may be times you may not your carryalls to pick up and carry your units for repair. You may rather have your mechanics in the field do a quick fix up. You may not wish to risk them to enemy fire. Or you may be getting ready to transport a force.
The red button will abort a move and return units they may have already transported to original spot. The green button toggles yellow and green and is used to pause (yellow) a move until you are ready for the action to take place (then click it green). For example, you lasso a ground force then press air transport icon.

Air Transport Icon
Next, you click green button to yellow. Then click where you want the ground force to be transported to. It will not take that action until you click the button back to green. This will allow you to execute the move the second you are ready. Meanwhile, you can plan and execute other aspects of your strategy and call upon these forces with the click of a button. Keep in mind you can use the mainmap or radar map (in minimap) to click your destination- just like you move all and any other of your units.

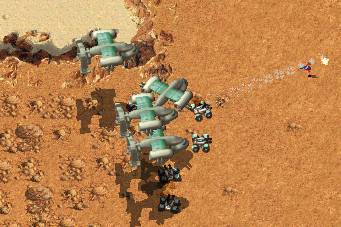
Ground Corp Icon
This icon will bring up your ground corps command minimap. It allows you to set groups, coordinate and control your ground groups. In illustration below it is shown in the left minimap.
This menu's first set of buttons consists of ten group icons, numbered one through zero. If a particular buttons number is yellow, it means that group of is set to go on mission. If a buttons number is green-gold, it means that this group is available for missions. If a buttons group number is red, it means that that group is engaged with an enemy. If there is a white number, it means that group number is available for use. Lasso desired units, click on it- it will then turn green-gold. To change stages (colors on buttons) you left click on these buttons much like you work the air group buttons.
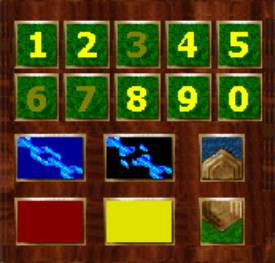
Ground groups menu.
The next two "chain" buttons allow you to form groups and break up groups. Perform this action on groups when their number icon is yellow or green-gold.
The up and down arrows toggle you through and centers view on your numbered groups.
The red button, as you may of guessed, halts whatever actions you may have clicked in earlier. You of course may click on any icon on command bar as well, and it will affect any groups whose icon number is yellow. For example, in the menu above, right now, pressing one of the repair icons on command bar will order the groups 1, 2, 4, 5, 8, 9, 0 to report for repair.
Finally, the green/yellow button (which is yellow at the moment) works just like the green/yellow action button in the air corps menu. In this case several groups are standing by for the player to click it to activate the actions he or she had set- most likely attack several spots from several directions. Remember you may use waypoints as well (on command bar); you don't have to press directly on a target until your path is set.


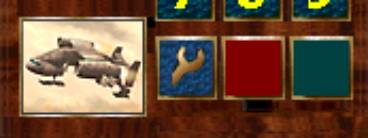
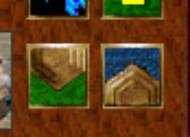
Repair Icons
Pressing the repair icon on the left will assign a unit or building to full repair. For a vehicle, that will entail traveling or being transported by a carryall to a repair pad. The units will return (or be returned by transport) to where you first "repair clicked" them if you click the waypoint icon right after you click (left) the (full) repair icon. For example, to have vehicles go and return to same location only by transport (carryall) you would: left-click the full repair icon, left-click Air Transport icon, left-click Waypoint icon, left-click on units you wish to repair, then right click to escape.
Pressing the repair icon on right will assign a unit or building to half to three-quarter repair. With buildings, this is useful if money is short but a building(s) is in need of repair. With vehicles, it assigns them to report to the closest mechanics for a quick patch-up (half to three-quarter depending). If mechanics are not available, units will not respond.
These actions and behaviors can be preset for each unit or even entire groups using the various menus available, menus such as the attributes and corps menus. For example you can set the carryall attributes to whether or not to generally transport items to be repaired. Note: medics will auto-minister to your troops with no interaction from you other than perhaps having them locate where you need them. If you don't even touch them, the medics will gravitate to the wounded.

Attributes Icon
Pressing this icon after left-clicking a unit, lassoing several units, or pressing a group icon (note: the Corp or group menu will give way to attributes menu when you press Attributes icon while in the Corp or group menu, but left-clicking left minimap (7) control icon will return you to the Corp menu. Right-clicking on left minimap control (7) will return you to Attributes menu without losing your new settings. Of course it depends which minimap you were utilizing in the first place) will bring up the attributes menu for whatever you had selected.
On a side note: When opening minimap menus, Dune III will use a free minimap or use one that is already open- saving whatever minimap menu or view you were using prior to it. By using the minimap controls (7 and 9) you can toggle quickly through whatever menus and views you have open without losing any settings, etc. that you may have been working on- including conversations with human or AI players.
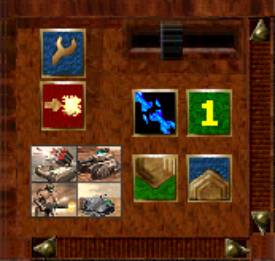
The attributes menu will vary depending on the unit, group, or whatever you selected to set. The menu below, however, should give you an idea of what tasks and behaviors an attributes menu sets and controls. In this case, for instance, lets say you left-clicked on a single unit, say a missile tank, then left-clicked on the attributes icon. It would open the menu illustrated below.
The repair icon (top left) can be toggled from half repair to full repair by left-clicking on it. The slider to the right of this icon will allow you to set the unit to seek repair (type: half or full) you had set (as explained in preceding sentence) automatically. Setting slider all the way to the left sets the unit to seek repair with minimal damage. Moving slider in the middle sets unit to seek repair with medium/half damage. Moving the slider all the way to the right sets the unit to not seek repair automatically, a "do or die" setting.


The red icon sets the distance the unit will engage a target. With a missile tank you will usually set to maximum standoff, but in-group attacks you will find you will adjust this from time to time. Note the blank setting on left. This indicates that you wish a unit to stand off out of range. This can be useful to bait enemy units, hold fire after taking an enemy base so your engineers could capture its buildings, or perhaps, you put your leader unit in an APC and wish the APC unit to avoid contact with any enemy units.
The "chain" icon and the green "group" icon work together. The green icon lets you know this missile tank is part of group 1. By pressing the "broken link" icon you can free this unit from group 1.
The green down icon and the blue up icon will toggle through all missile tanks in your inventory while centering main view on each unit. Useful for various tasks you will find, especially since Dune III has maps up to 256x256.
One more example: lets choose a group, then press attributes icon to bring up this menu.
Center Controls
The center of command bar contains the left minimap toggle (7), the communication control icon (8), and the right minimap control icon (9).
Left clicking the left and right minimap buttons allow the player to toggle through whatever minimap functions they are using without losing any information or settings. Right clicking these buttons brings up OPEN, RESET, MINIMIZE and CLOSE. OPEN will give you just your logo if you haven't built any outposts yet. You must build two outposts to run two minimaps.
RESET will set your minimaps back to default mode, generally the radar map on right, the left minimap closed and ready.
MINIMIZE closes both minimap views but keeps your settings and open cameras available.
CLOSE will simply turn off both minimap views and give the player a full screen play area.
The communication icon (looks like Dune) allows you to answer "calls" from other players by left clicking on it. It will display information about your foes (what is known anyway) by right clicking it. And finally, will send play view to a trouble area on audio cue ("your base is under attack").
When called or given a audio cue, the Dune icon will blink. Often, on calls, an audio sound will clue the player in on who is calling.


Guard and Patrol Icons
The guard icon simply sets a unit, units, or group to "be in guard mode"- proactive to enemy incursions. The player selects the unit, units, or group from group menu and left clicks this icon.
The patrol icon is more involved. The player selects the unit, units, or group from group menu and left clicks this icon. Next, left click on location (on radar or play screen) where you wish the unit(s) to move back and forth from. You may left click up to four points to pick their route. Right click to exit from this function. The selected unit or units will now follow the patrol route as the player specified and be in "guard mode". If they should engage an enemy, they will return to "patrol" after.


Formation and Waypoint Icons
The green waypoint icon allows you to pick the route for the forces you wish to move. These forces will move in single file as quickly as possible. If they pass an enemy, they will not stop to engage but will fire their weapons in passing- use patrol icon for reconnoitering. You can pick up to four waypoints plus final location.
The formation icon will have your chosen forces move at the same speed and spacing/order- depending on terrain- toward chosen goal. They will stop and duke it out with significant enemy forces, but for the most part, will advance toward goal.

Rally Icon
The rally icon gives you the option of halting an attack or move and having an orderly retreat. This command can almost be duplicated in-group menus; the difference is the player may designate a rally point prior to making a move or attack.
To designate a rally point, left click on rally point without selecting any unit or units, then left click on desired rally point.
To implement a rally, select unit, units, or group, then press this icon. The specified force will attempt to move in an orderly and defensive fashion to the players designated rally point.
As the player plays Dune III, he or she will note many things will be done automatically. Medics and mechanics assigned to a group will minister to the units of this group while keeping out of the way of enemy fire (generally), especially if the player sets his infantry and vehicles to report for (half to three quarter) repair after so much damage. Any medics and mechanics that are not assigned to a group will automatically go where needed.
Another example is a players force, while in formation move, come across a bridge they must get across. The formation will orderly cross the bridge in single file, then reform on the other side and continue their formation move.
Yet another example could be the easy loading and unloading of bunkers, APC's, and carryalls. The player will note he can lasso any number of infantry, for instance, and press on a bunker. If a player lassoed more than five infantry, it doesn't matter- only five, the maximum number of infantry that can fit into a bunker, will man the chosen bunker. To exit, the player double left clicks said bunker and all infantry will exit the bunker quickly.
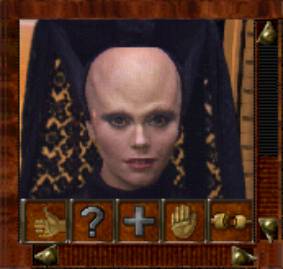
FMV Menu Icons
To interact with the AI characters, the five icons under the FMV are utilized. They are the agreement icon (16), the query icon (17), the more icon (18), the halt icon (19), and the disconnect icon (20).

The thumbs up icon when left clicked will indicate agreement with whatever is suggested or asked. The conversation from the AI character, whether your mentat, an enemy, or "whomever", will be via audio with lettering ("letter box") enabled or not enabled. If a single yes or no answer were all that is necessary, the only icons needed would be the thumbs up or the palm up icons (for no).
While a yes or no answer is useful, perhaps you would like more information or comment before giving a yes or no answer. To coax more information from whatever "character" is on the screen, then left click the plus icon.
The question mark icon, or query icon, gives the player tremendous latitude concerning interaction with the AI characters. When left clicking this icon a drop down menu with appropriate options will open.
The final icon, the disconnect icon, will simply "hang up" or cut transmission.
For example, the player is in a game. The Dune icon blinks and a tone sounds. The tone is one that the player recognizes as a "call" from his mentat. The player left clicks the left minimap control (7) to open communication with his or her mentat via the left minimap.
His or her mentat appears, makes a greeting (My Lord, Fortune passes everywhere, Dire warning my Lord, etc.). The AI character will next announce, just for instance: "My Lord, to the southwest a tremendous Imperial force is advancing. so much for Imperial neutrality, eh, me' Lord?"
Now let's say the situation is being played out on a massive 256x256 map and the player's radar map does not show far enough to the southwest to see this advancing force. Thus the information the mentat gives the player is actually useful. Perhaps a bribe to the Fremen to the southwest, or perhaps you agreed earlier with your mentat that sending a spy to the southwest would be wise, enabled this information to reach your mentat so that he could now inform you.
Anyway, suppose next the player presses the plus icon. The mentat will now elaborate accordingly, in this case continues: "The exact composition and whether the force is hostile to us is unknown. As you know, Fremen raids have really aggravated the Imperium lately, or perhaps they perceive the Ordos to our west to be more of a threat to them!"
At this point the player could press the plus icon again, and the mentat will suggest a course of action, which the player may agree to or not by left clicking the appropriate icon.
Or, the player could left click the question mark, or query icon. This in turn will open a menu with, for example, the following options: Send three cloaked trikes to investigate but not engage? Send a force I will chose to hail the Imperial force in the field (to determine their intentions)? I will ambush them, I'll assign Group x for you to strike them from the northwest? Do nothing? Etc.
For now, a premade list of appropriate options could be listed for quick gameplay and ease of action. A powerful parser could be another option: a player would type in commands ala a Zork type text game. Interaction with human players would of course involve typing and/or microphones.
Of course a player could react to the Imperial advancing force via marshalling their forces themselves, sending air strikes (the air forces would be smarter and not bomb the area where the force on the move was when the player targeted it, but actually bomb the enemy columns- just as real life pilots would have the sense to do), or even "call" the Emperor and simply ask what his intentions are.
Small subplots involving Bene Gesserit, smugglers, etc, should be in the game for more realism!