


Melange - The Planet Arrakis:
3. Contents: Planet Information
- Greeting
- Terrain
- Environmental Hazards
- Lighting Effects
![]()
We have intercepted the following message, and hope that you shall find it useful.
WARNING: This information is classified, and reserved only for the eyes of the Duke Leto Atreides.
1. Greeting
My Lord Duke,
I have compiled the report on our investigation of Arrakis that you requested. Initially, the Judge of the Change, Imperial Planetologist Kynes, was reluctant to assist us in our endeavours. As I am sure you will agree, his caution is justified, for he has spent many years under the callous Harkonnen fief. Gradually we were able to persuade him to provide information about this fascinating planet.
As to other matters, our initial negotiations with the Fremen are proceeding well. They are a suspicious and independent lot, but I am hopeful that they will soon agree to aid us in defending Dune from the Harkonnens' wicked appetites.
I look forward to your arrival on Arrakis, sire, and hope that Kyne's report shall be of use to you.
Forever your servant,
Duncan Idaho
2. Terrain
1. Desert Tileset
1. Geographical Terrain
1. Sand
Sand is the most common form of terrain found upon Dune. Sand is one of Arrakis' many irritants, for it makes the operation of any machinery on this planet a difficult and costly affair. I suspect you will need to modify your current vehicle schematics to permit easier travel on this terrain.
The fierce winds of Arrakis sweep sand particles into damaging sand storms, some of mile-wide proportions. The sand of Arrakis is mostly a product of worm digestion: dust is produced by the constant surface creep, the 'saltation' movement of sand. These storms shall be discussed later, but I should warn you at this point that the nature of Dune's winds have produced a phenomenon we have dubbed structural entropy. Any unfortified buildings placed on the surface will suffer gradual, but continual damage from the windswept environment, and will require constant repair. Worst of all, sand is the domain of Shai-Hulud, the Sandworm.
Sand can vary in texture, making it easier or harder to travel across it. This also has an effect on the degree of sandworm activity in an area, and therefore immediately on how much spice is available in the region.
2. Dune
The constant windstorms form extensive sand dunes, that considerably slow the progress of most ground Units. Infantry are only minorly hindered, while Vehicles are slowed to a crawl.
Units will slow down and tilt when rising on inclines, and speed up when sinking in dips, their engines whining when driving up steep slopes. Coarse grains are found on the downwind sides of dunes. The windward side is packed smooth and hard. Therefore Unit movement is also effected depending on which slope you are traversing. Dunes can reach heights up to an extreme 1,500 metres, and some slopes will be too steep for certain Units to climb. The move cursor will become unavailable in such areas (such as at the edges of ravines).
I would advise you to make use of the benefits of elevation wherever possible. Firing from higher ground on enemy Units below you will not only inflict greater damage than normal, but will also increase the range of your shots. You can also use the terrain as cover against enemy fire.
If dunes suffer sufficient damage, it is possible to cause sandtides, rivers of sand which tumble down the sand incline and bury Units in their path. Storms can also trigger these.
Gaseous clouds accumulate in the lower sinks and dunes -- through the quanats, or canals, that cross the surface. These natural poisons, similar to the Ordos' toxic gases, can be damaging to unwary Units.
3. Spice
There is no doubt that the planet Arrakis would be easily forgotten if it were not the only source in the known Universe of the spice, melange. As you well know, my lord, the spice is essential for the survival of the Imperium. Although addictive, it permits the Guild Navigators to employ a method of travel between the distant stars, and its geriatric properties provide longevity to all who consume it. It cannot be artificially manufactured, and is found only on the surface of Dune. Cinammon-flavoured and dark orange in colour, it develops on the upper layers of some sand plains, and would initially appear easy to harvest, if it were not for the threat of the Shai-Hulud, and Dune's other perils. The Worms are territorial, and jealously defend spice sands. The Harkonnens employed a tactic of entering the spice fields and getting out with as much spice as possible. I suggest you do the same. With Spice there are always Sandworms. Therefore you will find the richest Spice Fields to the south.
The properties of melange are portrayed on the battlefield. Infantry Units can become addicted to the spice if they are exposed to spice fields for too long. Spice will slowly creep to adjacent sand cells, but the main source of new spice is Spice Blooms, and consequently the Sandworms.
4. Dense Spice
Some spice seams become condensed with several concentrated layers. These dense spice trails will provide a far greater yield when harvested, appearing as an additional layer over an existing field. Harvesters process the spice at a fixed speed, one layer at a time. Spice fields can be damaged by cannon fire, missile impacts, and explosions, on either the spice itself, on Units above the spice, or on Sandworms under the spice. Spice fields cannot be directly damaged by rifle fire, machinegun fire, Deviator missile impacts, sonic blasts, or Sandworm activity.
5. Rock
Formations of rock provide the only suitable surface on Arrakis for the construction of buildings. Bare rock is not an entirely appropriate location, for Structures built directly on the surface will be particularly prone to structural entropy. I recommend that you employ some form of foundational material to combat these effects. Rock is also particularly important for safety, as Sandworms are incapable of crossing rock formations. Often these building sites are "islands" of rock, largely separated from the sand by ridges with only a few accessible entrances.
Due to the abilities of the Voxel engine, it will be possible to deform terrain. Therefore rock could be sufficiently damaged by heavy weapons fire that a region becomes too cratered for Structures to be built at this location. Or more obstructive terrain could be sufficiently flattened by weapons fire to make building possible. However, Scientists can be used to terraform warped rock back into a regular flat segment.
6. Rocky Ground
Rocky Ground consists of uneven layers of gravel, sand and jagged rock. This surface is unsuitable for construction. Vehicles cannot traverse this unstable terrain, though they can be climbed relatively well on foot. Such Infantry will find a safe haven from Shai-Hulud on these elevations. Sometimes these areas can provide paths through ridges to locations otherwise inaccessible by Vehicles.
7. Mountain
Mountains and ridges are rugged crags that are an obstruction to all ground-based Units. They will hinder all but aerial Units. Some sandy cliffs can be smoothed out through weapons fire to expose climbable slopes.
The Shield Wall is a vast ring of mountainous ridges that separates the habitable northern areas of Dune from the hostile forbidden regions in the south. The ferocity and frequency of Sandworms in this area makes heavily Vehicle-based tactics a serious liability. Therefore, operations beyond the Shield Wall will need to rely on desert power, the predominant use of Infantry and Aerial Units, with extreme caution in the use of mechanised Vehicles.
Mountains can be used as natural defence against Tactical Missiles, evolutions of the fearsome Death Hand. They are too tall for these Missiles to fly over, and they will collide on contact with the side of a Mountain. Use this feature of the terrain to your advantage.
2. Hazardous Terrain
1. Spice Bloom
Spice blooms are bubbles of pre-spice mass that develop under the sand. This mass, after exposure to sun and air, becomes Melange. If a Spice Bloom is pierced by weapons fire, or Units moving over it, the bubble will burst, spewing spice over the surrounding area. This field will be composed of a single layer of spice around a double-layer spot at the point of detonation. They will develop dynamically, and eventually swell to such an extent that they will burst on their own. A spice bloom is the only terrain feature that can be directly targeted for attack by most ground Units. Spice produced by a spice bloom will not be deposited on sand dunes, on rock, or over any spice already on the sand near the bloom. Spice can appear underneath any Units which are on the sand near a detonating spice bloom. Sandworms can move under Spice Blooms without triggering them.
2. Tidal Dust Basin & Dust Chasm
Certain depressions in the desert have filled with dust over the centuries. Some are so vast they have currents and tides. All will swallow the unwary who step into them.
Tidal dust basins vary in fineness. Some are sturdy enough that lighter Units, such as Trikes and Infantry, can traverse them safely, but they are a danger to heavier Vehicles. Other Dust Chasms are fragile enough that the slightest weight will swallow a Unit. Tidal dust basins are impassable to burrowing units, such as the Atreides Sandborer.
3. Drum Sand
Drum sand is a condition of sand compaction. The slightest movement on it sets it drumming. This rhythmic motion rapidly attracts Worms.
2. Polar Tileset
Above the habital northern regions of Arrakis, there is a very small arctic pole, consisting of the cap and the polar sink. Surrounding this is a region known as the Wormline, indicating the farthest north points where worms have been recorded. Moisture, not cold, is the determining factor. From space, the polar caps have the appearance of the finest cloud-milk diamonds.
Some missions, particularly the early Ordos missions and each House's Secret Level, take place within the small icecaps of Dune's polar regions. Supported by handouts from their Guild employers, the Ordos' initial missions would involve sending envoys down to sabotage the operations of the other Houses in the desert regions and set them off against each other.
With the diminished light in this region, it could make for some really moody covert operations. In this area, the typical desert terrain is substituted for a new tileset. Certain units can become unavailable in a particular terrain set, scenario or under hazardous conditions.
Most of the changes between the two tilesets are cosmetic. Other than some new changes (such as a new slipperiness in the terrain, making it more difficult for certain Units to maneouvre), these are functionally similar. The appearance of this terrain differs however (bearing more of a white and blue colouration and an icy complexion from trapped frozen moisture), and Structures built in this region will also have a more frozen appearance. Despite the colder climate, the polar wastelands are no more hospitable than the sandworm-infested deserts.
1. Geographical Terrain
1. Frozen Sand
Large clumps of dry sand, locked together by frozen trace moisture. As with sand, Units leave tracks and footprints in the frozen sand, and Scientists can terraform Frozen Sand into Icy Rock, or vice versa. You will need to keep your Units on the move. If a Vehicle is left idle for too long, its engine will cut out or have start-up problems. If this occurs it may take a few seconds, or even longer, before the Vehicle can respond to your requests. In extreme cases, they will be rendered immobile by the cold, and may have to be thawed with close weapons fire. Flame weapons are particularly effective for this, as they produce a stream of heat, melting all ice in the path. Infantry can suffer damage from exposure, causing burnwounds by the cold alone.
2. Frozen Dune
Functionally equivalent to the desert tileset's Dune, other than the changes mentioned above. Most of the effects of standing on Frozen Sand also effect Frozen Dunes.
3. Spice
Spice can be found in the polar regions, though it is rare. Dense Spice is practically exotic. The caps have spread over the centuries, so Spice lies just beneath the icy crust. There are no Sandworms in this climate, and consequently no source of Spice Blooms to replenish Spice. Resources must be used carefully, with heavy reliance on funds provided by your superiors, scrap recycling, and acquirement by alternate means, such as stealing enemy spice and capturing Silos. A commander in the polar regions will need to be more conservative about his expenditure, but it's adequate compensation for an environment that isn't prowled by Sandworms.
Some polar missions will be so starved of spice that you will have to rely on spice convoys from elsewhere in your domain. Harvesters will arrive from off-screen on a regular basis, unload at your Refineries, and return to adjacent maps for a fresh load. You wouldn't have to harvester yourself, but you would have to protect the Harvesters as they are brought in, and returned again. Resources are limited, so these convoys will be precious and valuable to you. Carryalls may or may not be available, so your vulnerable Harvesters might have to travel over land to reach you. However, your opponent is equally disadvantaged, so you can sever his supply of resources!
4. Icy Rock
These flat masses of ice are used as building construction sites, having similar functionality to rock in the desert tileset. However on Icy Rock, concrete foundations are not required, and structural entropy is almost totally eliminated. Your Units will tend to move with difficulty, however, skidding across this treacherous surface with a degree of inertia. Aircraft may have difficulty landing.
5. Rocky Ground
Much the same as Rocky Ground, these areas are too unstable for Vehicles to cross, but they can be traversed by Infantry.
6. Mountain
Again, this terrain type differs little from the desert version. These shelves of inaccessible rock are impassable to standard ground-based Units. Therefore aerial transports will be of considerable importance in this region.
2. Hazardous Terrain
1. Tidal Dust Basin & Dust Chasm
Functionally equivalent to the desert tileset's versions, other than the changes mentioned above.
2. Avalanche
Loud noises such as shooting and explosions near the bottom of a cliff could send sand tumbling down on Units below, burying them. Excessive weapons fire can melt nearby polar terrain, leading to Avalanches.
3. Blizzard
Blizzards are the polar equivalent of Storms. Frosty air is usually very dry, and friction can charge the air even further. These "icestorms" sweep up loose ice-cold sand, creating unpleasant low-velocity showers. While considerably less harmful than the desert's Storm, Units caught in a Blizzard have a highly accelerated likelihood of freezing up, and the production of effected Factories is brought to a crawl. Visibility is reduced when a Unit is caught in a Blizzard. It will be tremendously difficult to target Units inside the storm.
3. Standard Terrain Features
1. Scrap
Metallic remnants scattered across the sands are not a true feature of Arrakis' surface, but the result of the warfare that comes to play here. Consequently it could be found anywhere on Dune where vehicular combat has taken place, and develops during the course of a battle.
When a mechanised Unit is destroyed, the remains of its smoking hull will remain on the battlefield. With the correct facilities, it is possible to salvage this scrap, and convert it into credits. The profit from this operation is nowhere near the benefits received from harvesting the Spice; in fact, the more that you harvest scrap during a mission, the less valuable it becomes. Nonetheless, though it could never hope to replace Spice as your primary resource, it is a useful temporary alternative when your harvesting facilities have been disrupted. It is more profitable to try to destroy an enemy Vehicle with weak weapons, for the weaker the weapon used, the greater the amount of scrap that is left behind. Although it is effective to obliterate enemy Units with weapons of mass destruction, they will provide little to no scrap benefit. Once created, scrap will soon become submerged beneath the sand, so you will need to act quickly to recover it. Tracked Vehicles can crush scrap in their path, obliterating it. Scrap can also be blown up with weapons fire. As a result, Salvagers won't have to be an essential element of your assault teams just to clear their path. Occasionally you may find salvagable scrap from a previous battle in your region, derelict Vehicles and Structures covered in sand, but this is rare.
Organic debris can also be discovered in a similar manner -- shredded corpses and sandworm skeletons, for example. Assuming that they are not too far gone, these can be reclaimed by Fremen.
2. Crates
Crates or Dropboxes will mostly appear on sand, but occasionally on rock or rocky ground. They do not appear on the Mini Map and cannot be destroyed. Possible Crates:
- Armageddon: A rare crate, it destroys all Units within a screen's range, friend or foe. Does not effect Structures. Icon: Spinning red skull.
- Airstrike: You are given a one-time use, fully charged Ornithopter Airstrike. It becomes available from the Palace, if you have one; otherwise you can find it under the Aircraft category on the Construction Bar. Icon: spinning Ornithopter.
- Armour Upgrade: The Armour of all Units in a four-cell range is upgraded by 10-50%. Icon: sheet of metal.
- Attack Range Upgrade: The Attack Range of all Units in a four-cell range is upgraded by 10-50%. Icon: red crosshair.
- Battery: The player's power output is doubled. Regular power levels will be restored in five minutes. Icon: glowing green lightning bolt.
- Cash: 1000 solaris are added to your Battle Account. Icon: spinning gold dollar sign.
- Cloak: Grant cloaking ability to all Units and Structures within a three-cell range of the crate. Cloaked Units in range will lose their cloaking ability (unless it is an innate ability, such as the Ordos Stealth Harvester). Icon: A cyan-green stream of light streaks around a red speckled planet.
- Destroy: The crate explodes, probably destroying the Unit that picked it up, and leaving a large crater. Icon: None.
- Firepower Upgrade: The Firepower of all Units in a four-cell range is upgraded by 10-50%. Icon: bronze puddle morphs into a bullet.
- Firing Rate Upgrade (Rapid Reload): The Firing Rate of all Units in a four-cell range is upgraded by 10-50%. Icon: Series of bullets in an arc.
- Heal: Heal all Units in four-cell range. Icon: A drop of water that splashes over the ground.
- Health Upgrade: The Health of all Units in a four-cell range is upgraded by 10-50%. Icon: red medical cross.
- Invincibility: Invulnerability to all nearby Units. Icon: A gleaming shield.
- Morph: Similar to the Unit crate, but the Unit that collects the crate is transformed into a random Unit. The benefit of this is that you retain the Unit's original experience level. So a Colonel (the highest rank of veterancy) Light Infantry can become a Colonel Devastator! Icon: None. Unit simply changes.
- Missile: Random Missile Strike given to player if silo in MAC is available. If not, Missile strikes at crate location. Icon: missile with red and green striped warhead.
- Overtime: Doubles the production speed of all of your Structures for a period of five minutes. Icon: green circuit board circled by crackling lightning bolts.
- Re-Shroud: Restore Shroud to entire map, except what your Units can see. Icon: opposite of Reveal crate icon, or a black orb with flickering electricity.
- Reveal: Reveal the whole map. Icon: a cloaked spinning globe is revealed.
- Sight Range Upgrade: The Sight Range of all Units in a four-cell range is upgraded by 10-50%. Icon: blue-in-blue Abab eye blinks.
- Speed Upgrade: The Speed of all Units in a four-cell range is upgraded by 10-50%. Icon: lightning bolt.
- True Sight: All cloaked or camouflaged Units are visible and all illusions vanish for a few seconds. Icon: Sonar pulse.
- Teleport: Upon picking up this crate your Unit will be transferred to another random cell on the map. Icon: flash of starlight.
- Uber-Unit: The Unit that picks up this crate will have all of his bonus attributes maximised to 100% for a period of 30 seconds. Picking up another Uber-Unit crate while maximised will restore the timer to 30 seconds. Once this period has ended, his original attributes will be restored. Icon: clock timer, glowing brightly.
- Unit: One Unit appears. This could even be an enemy unique Unit. For example, when playing Harkonnen, you could receive a Deviator. Icon: None. Unit simply appears.
- Upgrade: All Units in a four-cell radius are granted full experience, automatically gaining a rank and all associated statistic bonuses. Icon: Pulsing brain.
4. Underground Terrain
Underground missions occasionally take place, usually in subterranean Fremen sietches and caves. These interior missions have no base building elements, and the player is provided with a limited number of Units (although with sufficient maintenance potential, reinforcements and leeway that the missions do not become frustrating). There is danger of cave-ins in poorly supported areas, and pockets of poisonous gas. And of course, the Fremen themselves.
One may be expected to, for example, find and seize one of their secret water caches, or make contact with Stilgar of Sietch Tabr to gain assistance after the fall of Arrakeen. Underground missions are usually accessed by finding an access tunnel in an earlier mission. For example, in the Atreides campaign, having raced against time to recover Kynes, stranded in the desert by the Harkonnen, he will reveal the location of his sietch to you. A sietch entrance will then appear in a previously featureless cliff wall. Entering the sietch will start the next mission, which will take place underground.
3. Environmental Hazards
1. Shai-Hulud
Sandworms are fierce subterranean creatures native to Arrakis. Growing to enormous size and living to a great age, they defend spice fields, attacking anything on the surface that creates a vibration. As a result, they can be a detrimental to your harvesting operations. Fortunately, they will go deep-sand to aid digestion after an attack, but feeding the beasts with your troops is hardly an efficient tactic.
Sandworms have a priority level for attacks, based on the level of vibration created. Units standing still have the lowest priority, followed by moving Units, Suspended (hovering) Units, Shielded Units, and finally a Thumper. The Sandworm's decision is also reflected by the type of terrain the Unit is occupying. Units standing on sand have the lowest priority, followed by Dune, Spice, and finally Drum Sand.
Sandworms become more dominant as you progress towards the south of the planet. You will find additional, more aggressive Sandworms in these regions, as well as an abundance of Spice. In Melange, Sandworms are more directly linked to the ecology of the planet. Spice Blooms, the source of fresh Spice, are produced by the Shai-Hulud. Periodically, a Sandworm deploys one of these Spice Blooms, and this is the manner in which Spice is replenished in a mission. Therefore prematurely killing Sandworms on the map will eventually lead to your supply of Spice being cut off. You will have to tolerate these beasts to ensure additional resources, although the spice itself will grow on its own over time.
If a Sandworm is shot down to medium (yellow) health, it will withdraw, coming back after a certain amount of time once it has restored its health. If shot down to critical damage, the Sandworm will be unable to create Spice Blooms, and will rampage, becoming highly aggressive until its health has regenerated, or it is destroyed.
2. Storms and Storm Prevention
The storms of Arrakis can be devastating. Built up across several thousand kilometres by other atmospheric forces, they can reach windspeeds of up to seven hundred kilometres per hour, capable of ripping flesh from bone. Weather Satellites can provide an early warning of their approach, but Sand Storms may be so devastating that the only alternative is to evacuate a poorly prepared base. Storms are particularly effective on sand, and will bury Trenches, smothering the occupants, and other such sand-based buildings. Visibility is reduced when a Unit is caught in a Sandstorm. It will be tremendously difficult to target Units inside the storm. In addition, Storms will sever the link between your Ix Research Centre and orbitting Satellites, causing them to drift out of control.
There are essentially two kinds of Storms: Electrical Storms, and Coriolis Storms. Electrical Storms cause only a small degree of damage, but cover a wide area. They will mask a region in a similar manner to the Atreides Chameleon's smoke grenades, making it impossible to acquire targets under the Electrical Storm. Worse still, this Storm will short out any and all shields that it encounters, including wide-area Structure shields such as Perimeter Shields. Suspensor Fields will also be disabled, as well as cloaking technology. The Corrino Suspensor Harvester, for example, will be rendered temporarily immobile. High-tech weapons will be rendered inoperative. Aircraft in flight will almost certainly be destroyed by the Storms. It will become impossible to launch Tactical Missiles. Only low-tech weapons and defences, such as standard Infantry, will remain operable. Therefore Units lower on the Tech Tree will continue to be valuable throughout the campaign. Variance of Units will be essential. Coriolis Storms are concentrated and powerful, approximately the size of a Red Alert chronal vortex. They will cause severe damage to anything they contact. Fortunately, facilities are available to defend your Units from this threat, such as underground Bunkers and the benefit of Stormsheaths. Base Walls will be of even greater importance, for they can be used to impede the movement of Storms into your base.
As you travel north, you will find Storms to be a more common threat. Therefore random wind effects are more extreme, and wind speeds are increased in these regions. The Wind will randomly change direction and strength, moving Storms about the map. Winds will effect certain weapons. They increase the random nature of heavy artillery projectiles and tactical missiles, and the direction and rate of movement of poison gases. For example, the cloud of poison created by the Ordos Nerve Gas Missile will be blown around more rapidly and erratically in the northern half of the planet. Wind also effects the movement rate of your Units. If they are fighting against the direction of the Wind, it will slow them down, but they will accelerate to greater speeds if the Wind is behind them. Your House's banner is displayed on some of your key Structures, such as your Construction Yard. This flag indicates the direction and intensity of the Wind on the current map. The increased windspeeds in this region will also accelerate structural entropy, although the power yield of your Wind Traps will also increase as a benefit. In a similar manner, Solar Batteries are most effective at the equator, and become less effective as you move towards the poles.
3. Rare Disasters
In regions that occur along fault lines, additional problems can arise. Seismic activity can result in damaging earthquakes, and possibly even molten lava flows that gradually spread over rock, causing extreme damage to buildings and Units.
Some missions will even involve evacuation or fortification of a base to avoid or combat these hazards. Meteor strikes can sometimes occur, causing vast terrain deformation and incendiary damage over a random wide area.
4. Lighting Effects
By its nature, a harsh desert environment is a bland sight, and not particularly pleasing to the eye. However, a number of creative techniques can be employed to make the terrain a more interesting sight for the player. Firstly, the tint of the tileset can vary from place to place. For example, older dunes are yellowed by oxidisation, while younger dunes are the colour of the parent rock - usually grey. Varying the tilesets themselves also helps. For example, the largely blue and white polar terrain would really help to break the monotony. Excellent contrast can also be made by using vivid shades for the player's Units and Structures, and the interface itself.
An even more effective technique is the use of dynamic and ambient lighting effects. Tinting the terrain can effectively reflect the changing texture of the terrain. For example, sand could appear as a darker brown in the rocky areas, yet almost white in the southern deserts.
Shadows would also vary depending on your position on the planet, long and stretched at the poles, and hardly visible near the equator. A small detail perhaps, but one that can really add to the overall effect. Depending on the capabilities of the engine, shadows could also shift dynamically, gradually extending or shortening in length as the scenario cycles from day to night.
This leads to the most effective use of dynamic coloured lighting: atmospheric day/night transitions. The first Dune game by Cryo Entertainment used this to excellent effect, creating very moody and interesting scenes. While the sands of Arrakis appeared almost alabaster at noon, the colours shifted to warm shades of red and orange at sunrise, and puce and magenta at sunrise. At night, the world was plunged into deep purple and blue-black tones. The brightness of the moonlight during the evening even varied depending on the current phase of the moon.
The reflection of the light by the sand determines its colour, and the atmospheric composition of the planet effects the way the light is scattered. This provides different and interesting colours throughout the day-cycle, which is uniquely scattered by the sand, creating a sparkling "field of diamonds" effect. Perhaps this could used to represent noon, when the sun is at its peak. This can all help to create a myriad of colors, changing throughout the day, creating further variety.
1. Night Missions
In Melange, some missions will take place in the dark; you may be required to stealthily infiltrate an enemy's base, rather than rush in with guns blazing. This feature provides considerably more than a change of colour contrast. The game tactics change profoundly in nocturnal situations. Units can only attack what they can see. If an enemy is not within visual range provided by one of your Units, or illuminated by some light source, then he will be safe from detection. All Vehicles are equipped with togglable Headlights during Night Missions. If they do not have their Headlights engaged, they will move at half their regular speed, and are able to see and fire only half their regular sight range. However, if your Headlights are engaged, this will reveal your position to the enemy (but he will of course need to be within attack range before he can open fire). Headlights will not create a complete spherical area of light, but only a cone of illumination in front of the Vehicle. Therefore it is possible during Night Missions to sneak past an enemy on guard, or take him by surprise from the rear.
Weapons that create their own light, such as missiles, gun muzzles, tracer trails, explosions and incendiary projectiles will reveal themselves, as will Shields, active Electric Fences, and so on. Essentially, anything that produces groovy light-sourcing effects. You will have to rely on wormsign in order to keep tabs on Sandworms outside visual range of your Units. Some Aircraft become equipped with flares during Night Missions. They can be dropped to create a sphere of orange light in an area. After a while these will vanish once the flame extinguishes.
To provide light in your base, all Turrets will come automatically equipped with attached Spotlights. Turrets can only fire at an enemy if a spotlight or another light source in range is revealing the target. Infantry have the advantage in Night Missions. They have no speed and sight range reductions, as Vehicles do, and do not suffer from revealing themselves in order to overcome such losses. This makes Infantry your Units of choice during Night Missions.
![]()
Melange - Structures:
4. Contents: Structures
- Structure Hierarchies
- Legends
- Infrastructural
- Base Defence
- Power Centres
- Harvesting
- Surveillance
- Infantry Structures
- Vehicle Structures
- Aircraft Structures
- Unbuildable Structures
![]()
1. Structure Hierarchies
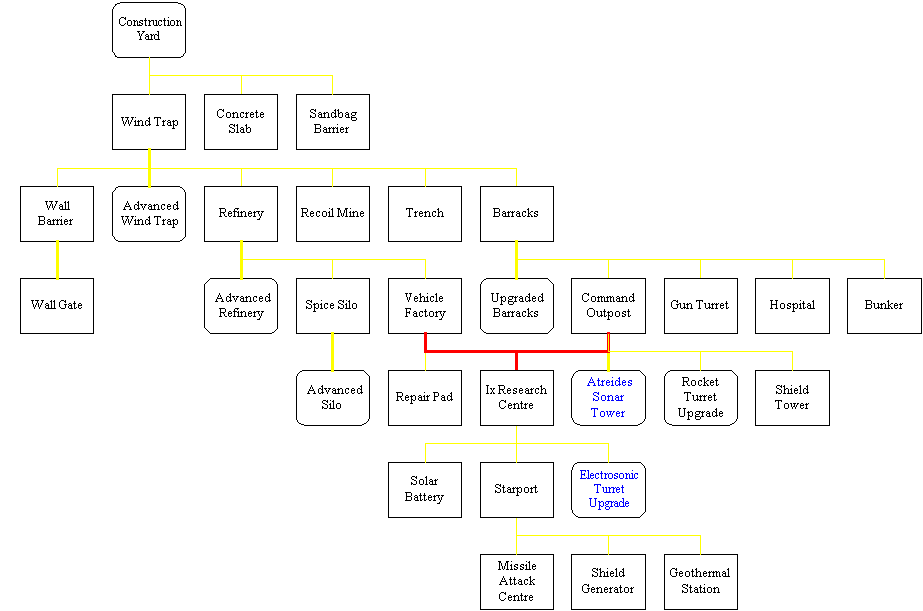
1. Atreides Structure Hierarchy
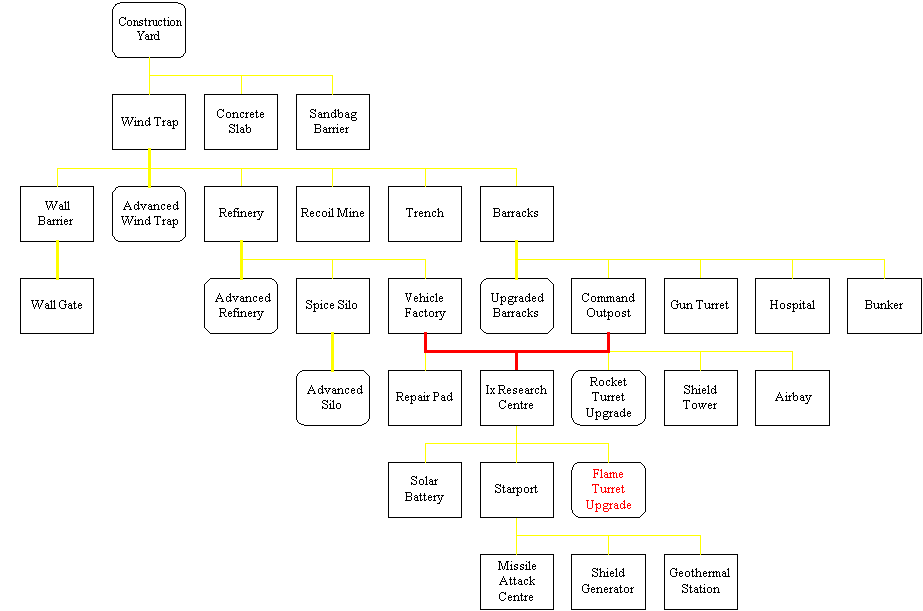
2. Harkonnen Structure Hierarchy
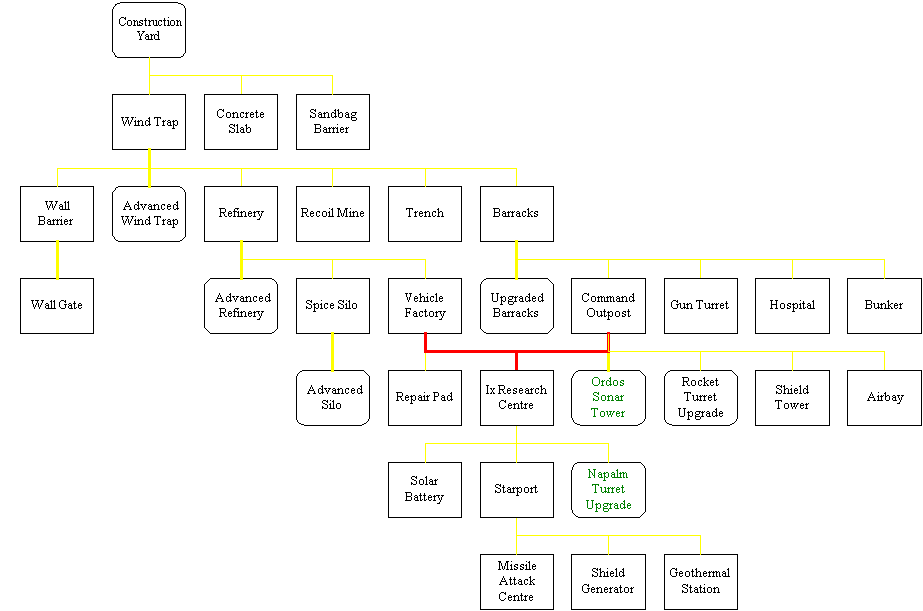
3. Ordos Structure Hierarchy
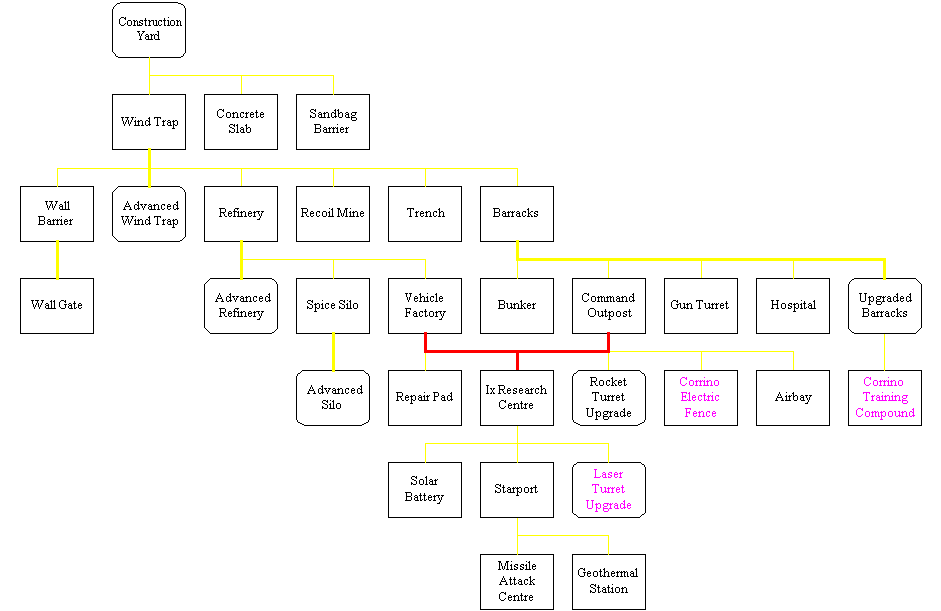
4. Corrino Structure Hierarchy
2. Legends
1. Structure Quick-Reference
Structure Name Health Armour Power Cost Requires House Construction Yard High Medium 20 N/A MCV All Small Concrete Slab Low Medium 0 20 Construction Yard All Large Concrete Slab Low Medium 0 45 Construction Yard All Huge Concrete Slab Low Medium 0 80 Construction Yard All Sandbag Barrier Medium Light 0 30 Construction Yard All Wall Barrier Low Medium 0 50 Wind Trap All Wall Gate Medium Light 0 50 Wall Barrier/Electric Fence All Electric Fence Medium Medium -5 100 Command Outpost C Recoil Mine Low Light -5 50 Wind Trap All Trench Medium Heavy 0 45 Wind Trap All Shield Tower Medium Medium -15 100 Command Outpost A, H, O Shield Generator Medium Heavy -300 2000 Starport A, H, O Turret Medium Medium AD+(-2?) 100+AD Barracks All Pillbox Medium Heavy 0 300 Barracks All Wind Trap Medium Light 080/150/100/050/040 225 Construction Yard All Advanced Wind Trap Low Light 180/250/200/150/140 400 Wind Trap All Solar Battery Medium Light 050/100/250/100/050 500 Ix Research Centre; Solar Satellite All Geothermal Station High Heavy 500 2000 Starport All Refinery High Medium -30 1500 Wind Trap All Advanced Refinery Medium Medium -30 3000 Refinery All Spice Silo Medium Light -10 150 Refinery All Advanced Silo Medium Light -15 300 Spice Silo All Command Outpost Medium Medium -40 750 Wind Trap All Atreides Sonar Tower Medium Medium -40 200 Command Outpost A Ordos Sonar Tower Medium Medium -40 200 Command Outpost O Ix Research Centre Medium Light 0 1000 Command Outpost & Vehicle Factory All Barracks Medium Medium -20 250 Wind Trap All Upgraded Barracks Medium Medium -20 200 Barracks (Upgrade) All Corrino Training Compound Medium Medium -20 400 Upgraded Barracks Corrino Hospital Medium Light -20 600 Barracks All Repair Pad Low Medium -30 800 Vehicle Factory All Bunker High Heavy 0 200 Barracks All Vehicle Factory Medium Heavy -30 1000 Refinery All Airbay Medium Light -25 700 Command Outpost H, O, C Starport Medium Heavy -40 1500 Ix Research Centre All Missile Attack Centre Low Heavy -300 2000 Starport All Palace Medium Heavy -50 N/A N/A All Fremen Sietch Medium Medium N/A N/A N/A Fremen Smuggler Armoury Medium Medium N/A N/A N/A Smugglers Village Medium Medium N/A N/A N/A Villagers 2. Command Layout
Commands 1. 2. 3. 4. 5. 6. 7. 8. 9. 3. General Structure Traits
- Capturable: While one of your Structures is disabled, any enemy Infantry Unit that enters the Structure will capture it. The Structure will then belong to that House.
- Damage Effects: Structures gradually lose effectiveness as they take damage, until they eventually are completely disabled when they reach critical damage (health in the red, or a third down on the bar). Power Centres will have a lower energy output, Unit factories such as Barracks will produce Units at a slower rate, Construction Yards will take longer to construct buildings, Refineries will take longer to unload Harvesters, Repair Pads will take longer to repair Vehicles, and so on. When Structures are disabled, they will not draw any power, nor will they be able to perform any of their normal functions. All command buttons will be unaccessible. Disabled status will be graphically shown by an electrical effect running down the Structure, similar to a Dune 2000 Devastator before self-destruction. If a Structure has its Stormsheath activated when it becomes disabled, the Stormsheath will be withdrawn. The Structure will have to be repaired to a state above critical damage before it will re-activate. Once the building is repaired out of the red damage level, then it will automatically come back on-line. If the Stormsheath was activated, the Stormsheath button will re-appear, and you can activate it again at your discretion. When a Structure is disabled due to critical damage, then and only then can a Structure be captured.
- House Appearance: As in Dune 2000, each House has a subtle difference in appearance between their Structures, and they are shaded in the principal colours of the Houses' Heralds. House Atreides' Structures are Blue and Silver, House Harkonnen's Red and Black, House Ordos' Green and Bronze, and House Corrino's Magenta and Gold.
- Persistent Pre-requisite: If a particular Structure is required before a certain Unit can be built, then you will lose build access for this Unit if the building is destroyed. For example, if you require a Repaid Pad in order to build a particular Unit, then if you lose your Repair Pad or it is disabled, then you become unable to build this Unit until the Repair Pad is destroyed. Incorporating this feature makes certain Structures, such as the Ix Research Centre, more worthwhile targets.
- Proximity Limit: Structures can only be built within a four cell range of an existing Structure of the same House. While this is double the proximity limit of earlier products, the limited "rock island" building situation makes it plausible to have a greater freedom in Structure placement.
- Pyrotechnics: Buildings may be set on fire if they suffer a hard enough assault (flame weapons are particularly adept at causing this). The fire will automatically be extinguished after a short duration, but while it burns, it will continue to leach the Structure's health. If the Structure is not continually repaired during this period, it could be disabled or destroyed by flame damage.
- Shrapnel: When a Structure is destroyed, showers of harmful flaming debris spout from the locus of the explosion and scatter over the surrounding area, damaging nearby Units, particularly Infantry. Aircraft flying above the exploding Structure also suffer harm. A small amount of shrapnel remains on the ground for a while, and can be harvested by Salvagers. It doesn't impede your construction however; you can still drop Structures on such scrap. The concrete foundations remain when a Structure is destroyed. When Structures blow up, the screen flashes white if the Structure is situated on the Battlefield Window at the time. This momentous feature helps to make Structure demolition more rewarding for the player.
- Structural Entropy: Buildings constructed without adequate foundations also suffer from structural entropy, a gradual reduction in structural integrity resulting from the harsh environment of Arrakis. Specifically, a Structure placed without any concrete slabs below it will begin with only 50% of its full health, and this will adjust based on the number of placed slabs. For example, the health percentages for a 2x2 Structure are as follows:
Given the inclusion of critical damage, there is a chance that the degree of structural entropy would have to be reduced, perhaps to 75% health without slabs, for example.4 slabs = 100%
3 slabs = 87.5%
2 slabs = 75%
1 slab = 62.5%
0 slabs = 50%
- Underpowered Effects: If your base drops below nominal power levels, your Structures will take damage, and House Shields, Radar, and Turrets will fail. Productivity will also fall.
3. Infrastructural
1. Construction Yard
+ + + + + + + + +
Health: High Armour Type: Medium Power: 20 Cost: N/A Requires: MCV House: All [Commands]
- 1. Pack Up: The Construction Yard is required to construct base buildings. It is first created from a deployed Mobile Construction Vehicle. The Pack Up command can be used to restore the Construction Yard to its MCV mode. This is most useful when it is necessary to evacuate the base, or the Construction Yard is under considerable threat and needs to be relocated.
- 2.
- 3.
- 4.
- 5.
- 6.
- 7. Repair: The Structure can be repaired using the Repair Cursor if damaged. For convenience, repairs can also begin by clicking this button. When under repair, a white Spanner icon will be displayed over the Structure. Structures with this option also have a slider over their health bar to set the degree of auto-repairing of the Structure that occurs without player intervention.
- 8. Stormsheath: The Structure is equipped with a Stormsheath. You can use this command to toggle it. Stormsheaths were described in detail earlier in the Interface.
- 9. Sell: The Structure can be sold for half its original credit value. Concrete placed below the Structure will remain.
[Build]
- All Structures
2. Concrete Slab
Small Option:
+ + + + Large Option:
+ + + + + + + + + Huge Option:
+ + + + + + + + + + + + + + + +
Health: Low Armour Type: Medium Power: 0 Cost: 20/45/80 Requires: Construction Yard House: All [Traits]
- Foundation: Concrete slabs are an integral element of base operations, permitting an adequate foundation for your buildings that will eliminate structural damage caused by the harsh environment of Dune. Unless a building sits completely on concrete, the building will suffer continual weathering damage from the erosive desert environment. As the smoothest surface available, they also permit the fastest travel speed of ground Units, resulting in no speed reduction. Terrain that has been covered with concrete cannot be deformed by weapon damage. They can also be paved over damaged terrain which would otherwise be too cratered to build upon. If a target cell cannot accommodate concrete, then concrete cells will only be laid on acceptable terrain cells. Once placed, Concrete Slabs cannot be sold. They must be replaced or abandoned.
- Irrepairable: This Structure cannot be repaired if damaged.
- Several Builds: This Structure's Build Slot on the Sidebar can be cycled through various options. A 2x2 ($20), 3x3 ($45), or 4x4 ($80) slab can be selected.
- Unselectable: No Selection Cursor will appear for this Structure.
4. Base Defence
1. Sandbag Barrier
+
Health: Medium Armour Type: Light Power: 0 Cost: 30 Requires: Construction Yard House: All [Traits]
- Barrier: Barriers are designed for inhostile defence of a base. They will block most direct weapons fire and prevent Units from moving through the perimeter. They can only be harmed by explosive weapons such as missiles. Barriers are built using the improved barrier construction system as introduced in the first offical Tiberian Sun patch. When a barrier section is placed over the screen, ready to drop, a row of white placement cells is drawn between the cursor and any dropped barrier segments within a five-cell range, if this distance is not obstructed. Then once the barrier piece is dropped, barrier segments will be automatically filled in between the two barrier posts. You are only charged for dropped pieces, not the connecting pieces. You can sell barriers cell by cell, but you will gain no money for it. Barriers can also help to protect your base against offensive terrain. For example, rogue flows of lava can be held back by placed Barriers.
- Crushable: This Structure can be flattened by tracked Vehicles, though it will reduce their speed.
- Irrepairable
- Several Builds: A horizontal or vertical segment can be selected.
- Storm Protection: This wall blocks Coriolis and Electrical Storms, stopping them from moving into your base.
- Unselectable
2. Wall Barrier
Horizontal Option:
+ + + Vertical Option:
+ + +
Health: Low Armour Type: Medium Power: 0 Cost: 50 Requires: Wind Trap House: All [Commands]
- 1. Upgrade to Wall Gate: While other Barriers are unselectable, the Wall Barrier and Electric Fence are exceptions. When clicking a built wall, the wall cell below the cursor will be selected, and a wall cell on either side will also be selected if possible. If this three-in-a-row configuration exists (and as the walls are built in three-cell rows, this is likely) then the Upgrade to Wall Gate option becomes available for this selection. This will transform this section of wall into a Gate, for the cost shown under the Wall Gate Structure.
- 2.
- 3.
- 4.
- 5.
- 6.
- 7.
- 8.
- 9. Sell
[Traits]
- Barrier
- Irrepairable
- Several Builds: A horizontal or vertical segment can be selected.
- Storm Protection
3. Wall Gate
Horizontal/Vertical (depending on orientation of Wall)
+ + +
Health: Medium Armour Type: Light Power: 0 Cost: 50 Requires: Wall Barrier or Corrino Electric Fence House: All [Commands]
- 1. Open/Close Gate: A Gate serves as a doorway through your perimeter walls. It is used to provide passage through Walls and Electric Fences. It can be closed when under attack to defend against enemy incursion, and opened to make easier access to your Units during quiet periods. If the most convenient method for player Units to enter the perimeter of your base is through a closed gate, the gate will automatically open for them. It is possible for enemy Units (particularly cloaked Units) to sneak through during the brief period while the gate is open.
- 2.
- 3.
- 4.
- 5.
- 6.
- 7.
- 8.
- 9. Sell
[Traits]
- Barrier
- Irrepairable
- Several Builds: This Structure's Build Slot on the Sidebar can be cycled through various options. You can select whether you want to place a Horizontally or Vertically oriented Gate.
4. Corrino Electric Fence
Horizontal Option:
+ + + Vertical Option:
+ + +
Health: Medium Armour Type: Medium Power: -5 Cost: 100 Requires: Command Outpost House: Corrino [Commands]
- 1. Upgrade to Wall Gate
- 2.
- 3.
- 4.
- 5.
- 6.
- 7.
- 8. Power Up/Down: Use this command (or the Stormsheath cursor on the Sidebar) to shut down a Structure that is not equipped with a Stormsheath. It will no longer draw power or be visible on the Mini Map, but all functionality of this Structure will cease. A "no"-ed lightning icon will appear over any Structure that is powered-down.
- 9. Sell
[Traits]
- Barrier
- Crushable (While Power is Off)
- Fence Power: House Corrino uses the Electric Fence to compensate for its lack of Shielding Barriers. While the Power is off, the Electric Fence will draw no energy, and will essentially operate like a Sandbag Barrier with increased strength. However, with the Power on, the fence will be electrified. Any Units (including your own) that come within a cell's distance of the fence will be electrocuted. The electrical discharge is incredibly effective against Infantry, but is also effective against armoured targets. Essentially, when electrified the fence becomes a short-range Tesla Coil, and cannot be crushed.
- Irrepairable
- Several Builds: A horizontal or vertical segment can be selected.
- Storm Protection
5. Trench
Horizontal Option:
+ + + Vertical Option:
+ + +
Health: Medium Armour Type: Heavy Power: 0 Cost: 45 Requires: Wind Trap House: All [Traits]
- Irrepairable
- Sand Structure: The Structure is one of the few not built on rock, but sand. These Structures will be buried during storms.
- Several Builds: A horizontal or vertical segment can be selected.
- Trench: A Trench is a concrete gutter driven into the sand. When placed, a Trench lowers the terrain by one vertical level. It provides excellent defence for Infantry standing inside, improving their firepower and armour, and making it more difficult for them be seen by the enemy unless at close range. They are only seen when firing or at a parallel cell. Vehicles can also be driven into the trenches, but once they have fallen inside, they become trapped. Be careful to remove all Units from your trenches if you are set upon by a storm, as the trench will almost certainly be buried during the storm, smothering any of your Units sheltering inside.
- Unselectable
6. Shield Tower
+
Health: Medium Armour Type: Medium Power: -15 Cost: 100 Requires: Command Outpost House: Atreides, Harkonnen, Ordos [Commands]
- 1.
- 2.
- 3.
- 4.
- 5.
- 6.
- 7. Repair
- 8. Power Up/Down
- 9. Sell
[Traits]
- Broadcasts Shield: The Structure uses the secondary phase of the Holtzman effect to generate an impenetrable defensive Shield. When a weapon of solid mass (missiles, bullets and so on) strikes the surface of the Shield, it is instantly destroyed. A continuous feed from your energy resources ensures that all assaults directed against the Shield (or objects on the other side) will be harmlessly and entirely absorbed. The Shield is impervious to harm, although the generator itself remains vulnerable to damage. Shields are particularly effective against mass rushes with powerful ground vehicles, but they are not invincible, despite invulnerability from most weapons. Laser weapons are the exception. Although lasgun fire will not harm the Shield itself, the sub-atomic damage will backlash to the source of the Shield. The Shield can also be penetrated by shielded Units, who can simply pass through the Shield unharmed, or Aircraft and Tactical Missiles, which fly over the Shield. Although the Shield protects the player from harm, his own Turrets and Units cannot fire at the enemy though the Shield either. When your Units attempt to pass through the confines of a Shield, it will automatically turn off, and reactivate once the area becomes clear again. Enemy Units could conceivably sneak through the Shield defences at this time. As Shields are not limited to materialising over rock (although the generator of the Shield must be), Sandborers and Sandworms (but not Sandriders) can pass under the Shield. Shields also drastically attract Sandworms, and as the Worms can move under the Shield with ease, they remain a considerable threat. The Shield does not need to be constructed segment by segment, unlike most defence Barriers, but is broadcast from another Structure, either between two Shield Towers, or from a Shield Generator. If a Unit is standing in the path of a Shield when it is activated, the Unit will be immediately vaporised.
- Shield Barrier: When two active Shield Towers are placed in a parallel fashion, a Shield Barrier is generated between them. The Shield Towers have a limited range; a Barrier cannot be generated between Shield Towers that exceed eight cells distance from each other. Lasgun damage to the Shield Barrier will be evenly divided between the two opposing Towers. Shield Towers become inactive if not fully powered, or if they are disabled or critically damaged. In this case, Shield Barriers between the Towers will not be restored until the Towers are reactivated.
7. Shield Generator
+ + + +
Health: Medium Armour Type: Heavy Power: -300 Cost: 2000 Requires: Starport House: Atreides, Harkonnen, Ordos [Commands]
- 1.
- 2.
- 3.
- 4.
- 5.
- 6.
- 7. Repair
- 8. Stormsheath
- 9. Sell
- Shield Radius: 1 --|--- 10 (Slider -- increased power drain with distance)
[Traits]
- Broadcasts Shield
- Perimeter Shield: The Shield Generator generates a square Perimeter Shield, with the Generator enclosed at its centre. The radius of the Perimeter Shield can be adjusted (using the slider shown above), though the larger the radius, the greater the power necessary to maintain the Perimeter Shield. When the Shield Generator is Stormsheathed, or off-line due to lack of power, a blue square is traced across the area where the Perimeter Shield would appear if it was active. Be careful not to materialise the Perimeter Shield at the location of existing Units or Structures, or they will be obliterated. If permitted to reach critical damage, the Shield Generator will automatically disable, bringing the Perimeter Shield off-line until the Generator is sufficiently operational to maintain the Shield. Therefore to shut down an enemy's Perimeter Shield, you must bring this facility down to the red (shielded troops can walk safely through the Perimeter Shield) or weaken enough power centres to powerdown the whole base. The player can turn off the Perimeter Shield manually by Stormsheathing the Shield Generator. Additionally, unless you can encompass a Spice field within the radius of the Perimeter Shield, the Perimeter Shield will shut down periodically to permit Harvesters to pass through. This is a moment of weakness to be exploited by the enemy. The range of the Perimeter Shield is reduced as the Generator takes damage, until eventually the Generator disables completely. The Perimeter Shield may occasionally flicker, or shut down for a second if there is considerable damage, or power is border-line. Given the expense and high power requirement of the Shield Generator, it is unlikely that a base will ever have more than one active at a time.
8. Recoil Mine
+ + +
Health: Low Armour Type: Light Power: -5 Cost: 50 Requires: Wind Trap House: All [Commands]
- 1. On/Off: Recoil Mines operate much like Shield Towers. A low-intensity harmless laser is projected back and forth between adjacent Recoil Mines (assuming that they are turned on). The Recoil Mines themselves are small and difficult to spot, and the laser can only be seen by Infantry Units at close range, and even then they must be standing still to notice them. If an enemy Unit crosses the path of this laser trip-wire, it will set off the alarm. If the Unit has some means of camouflage, this will be deactivated. Recoil Mines can be placed anywhere within range of your base, and cannot be triggered by your own Units. When turned off, the Recoil Mine emits no tripwire laser beams to adjacent Recoil Mines, and draws no power.
- 2. Arm: When a Recoil Mine is armed, an explosive device imbedded in the Recoil Mine will detonate when an adjacent tripwire is triggered, destroying the Recoil Mine, and probably taking the enemy Unit with it. Leave the Recoil Mine unarmed if you want it to be used repeatedly as an early-warning system.
- 3.
- 4.
- 5.
- 6.
- 7.
- 8.
- 9. Sell
9. Turret
+
Health: Medium Armour Type: Medium Power: Armament Dependent+(-2 if Spotlight active) Cost: 100+Armament Cost Requires: Barracks House: All [Commands]
- 1. Attack: The Structure has a defensive weapon installed. Although the Turret will automatically fire at enemy Units in range, you can manually select targets with this option.
- 2. Proximity: Activating the Proximity button will force a Turret to always fire at the closest target. When this mode is deactivated, the Turret will default to giving priority to the Unit types that it can damage most effectively. For example, if a Gun Turret has a variety of different targets in range, it will attack Infantry first, as it can mow them down easily, while Rocket Turrets will ignore Infantry in favour of Vehicles, unless there are no mechanical targets in range.
- 3. Spotlight Static/Roving: During Night Missions, a spotlight system becomes available on all Turrets. The spotlight can be set to either Static (remaining at its current position) or Roving (rotating around the Turret) modes. Right-click on the icon to switch between the two modes. Power Down the Turret to turn the Spotlight off. A Turret's Spotlight will be shattered if it gains damage to the extent that it only has 75% health. The Spotlight requires power to operate, so the Turret will draw an additional 2 points of power when the Spotlight is activated. As long as the Turret Attachment does not require power, it will continue to operate in blackout situations, but the Spotlight will shut off. When a Spotlight touches a target, even a cloaked enemy Unit, it and any other Spotlights in range lock onto the target, your Mentat will give the warning "Base perimeter breached" and the alarm will be sounded. You can then centre the screen on the location of this event if you desire. Any Turrets and Units nearby will automatically fire at the target. As long as the Spotlights remain locked on the target, it will continue to be revealed.
- Install Armament: When a Turret is first placed, it will start off with the default Gun Turret attachment. To replace an armament with another weapon, click either of the other two weapon buttons to install the appropriate armament. The button for the currently installed armament will be greyed out. The different weapon types are shown below:
4. Install Gun Turret: High-velocity Machinegun. Faster firing rate than the Rocket Turret. This armament is self-powered and operates as an excellent anti-Infantry defence, although it is ineffective against armoured targets. Requires Barracks. Cost: $150. 5. Install Rocket Turret: The Rocket Turret has a longer range than the Gun Turret, but requires power (-25). It is designed as an anti-tank defence, and is ineffective against Infantry. However, it is accurate and deadly against aerial Units, being the only AA-capable Turret defence. Against ground targets it is inaccurate at close range, but accurate from a distance. Stray rockets can cause local damage. Requires Command Outpost. Cost: $400. 6. Install Atreides Electrosonic Turret: The Electrosonic Turret requires substantial power to operate (-50), but has a very long range. The Electrosonic beam causes no physical harm, but disables any Vehicles that the field contacts for a short period. It has no effect against Infantry. Multiple targets can be hit as the electrical pulse jumps from the initial target to any nearby enemy secondary and tertiary targets. It is possible for a target that is out of the line of sight of the cannon to be hit by one of the secondary pulses; the more Units there are, the more effective it is. Therefore it is ideal for stopping tank rushes in their tracks, as the enemy will suffer heavily if a group of mechancial Units come within range of the beam. The Electrosonic effect also temporarily disables Unit shields and drains cargo energy. It might be necessary for the Electrosonic Turret to also effect your own Units for additional balancing. Requires Ix Research Centre. Cost: $1100. 6. Install Harkonnen Flame Turret: The Flame Turret is most effective against large groups of Infantry, as the flame spreads between flammable targets, but is also effective against armoured Units. However, the launched fireballs cause splash damage that can also damage your own Units and Structures nearby. The volatile fuels stored within this armament will also cause wide-area damage when a Turret equipped with this armament is destroyed. -30 power drain. Requires Ix Research Centre. Cost: $1100. 6. Install Ordos Napalm Turret: The damage from the blast is highly effective against Vehicles, but poor against Infantry. However, it also leaves a sizzling patch of burning napalm which remains on the ground for an additional five seconds. Anyone walking through it will catch fire, and can easily ignite nearby team-mates. -30 power drain. Requires Ix Research Centre. Cost: $1100. 6. Install Corrino Laser Turret: The Laser Turret operates under usual lasgun rules, but if the backlash effects it, it will only receive damage equivalent to an eighth of its total health, as opposed to total obliteration. It is very power-intensive, drawing -150 power Units. Each Laser Turret practically requires a dedicated Advanced Windtrap. It has a slow firing rate, but is very accurate and powerful. Requires Ix Research Centre. Cost: $1500. - 7. Repair
- 8. Power Up/Down
- 9. Sell: Selling a Turret will remove any attachment currently built onto it, leaving the weapon-less Spotlight base. Any one of the three attachments could then be installed on the base. Another sell click will remove the base tower itself. Turrets fire slower if your base is under-powered, and will increase in firing rate with surplus power. Once the unique fee for each weapon is paid, it will be installed.
[Traits]
- Several Builds: This Structure's Build Slot on the Sidebar can be cycled through various options. You can select whether you want to initially place the Structure as a Gun Turret, Rocket Turret, Atreides Electrosonic Turret, Harkonnen Flame Turret, Ordos Napalm Turret, or Corrino Laser Turret. It is possible to overwrite a Wall segment by placing a Turret over the Wall cell.
10. Pillbox
+ + + +
Health: Medium Armour Type: Heavy Power: 0 Cost: 300 Requires: Barracks House: All [Commands]
- 1. Release Units: The Pillbox is an enclosed fortified concrete emplacement, a heavily armoured haven for your Infantry. Up to four Infantry Units can be placed in the Pillbox at any time, and they are able to fire out of the Pillbox at enemy Units without taking damage themselves. Clicking this command will order all Units inside the Pillbox to exit the Structure. If the Pillbox is destroyed, the Units will automatically exit.
- 7. Repair
- 8.
- 9. Sell
5. Power Centres
1. Wind Trap
+ + + +
Health: Medium Armour Type: Light Power: North Pole: 80. Temperate North: 150. Equator: 100. Temperate South: 50. South Pole: 40 Cost: 225 Requires: Construction Yard House: All [Commands]
- 1. Overdrive: Power centres can be "overloaded" to increase power production to 150%, but this causes gradual structural damage resulting from the stress. This is particularly useful when you need to bring your defensive systems back on-line in the middle of an enemy attack. Additionally, having a surplus of power increases your rate of production. Damage to Power Centres reduces their power output.
- 2. Upgrade to Advanced Wind Trap: Wind Traps can be directly upgraded to their advanced version (for an amount of credits that is the difference between the regular and advanced versions), without the annoyance of having to sell the original and then replace it with the Advanced Wind Trap.
- 3.
- 4.
- 5.
- 6.
- 7. Repair
- 8. Stormsheath
- 9. Sell
[Traits]
- Height Advantage: This power-producing Structure generates more energy when on higher ground, such as hills.
- Wind Power: This Power Centre utilises the fierce winds of Arrakis to generate energy to power your Structures and defences. When a storm passes over a Wind Trap, it will temporarily double the output of the Wind Trap. As storms are more commonplace in the northern regions, winds also move at a faster rate there, and therefore Wind Traps produce more power in the north, their power output decreasing as you move towards the southern pole.
2. Advanced Wind Trap
+ + + +
Health: Low Armour Type: Light Power: North Pole: 180. Temperate North: 250. Equator: 200. Temperate South: 150. South Pole: 140 Cost: 400 Requires: Wind Trap House: All [Commands]
- 1. Overdrive
- 2.
- 3.
- 4.
- 5.
- 6.
- 7. Repair
- 8. Stormsheath
- 9. Sell
[Traits]
- Height Advantage
- Advanced Wind Power: This improved version of the original Wind Trap system produces double the energy yield of its predecessor, though at the price of a lower structural intensity. Thanks to the component nature of the Wind Traps, it is also possible to directly upgrade the original Wind Trap to the Advanced version.
3. Solar Battery
+
Health: Medium Armour Type: Light Power: North Pole: 50. Temperate North: 100. Equator: 250. Temperate South: 100. South Pole: 50 Cost: 500 Requires: Ix Research Centre;
A Solar Satellite must be launched before the Battery will begin to generate power.House: All [Commands]
- 1. Overdrive
- 2.
- 3.
- 4.
- 5.
- 6.
- 7. Repair
- 8. Stormsheath
- 9. Sell
[Traits]
- Height Advantage
- Solar Power: The blistering heat on the surface of Arrakis makes an ideal source of energy. Once the Solar Satellite has been launched from the Ix Research Centre, the Solar Battery can be used to store solar energy for use on the surface. The Solar Battery's greatest weakness is that storms can cause the Ix Research Centre to lose contact with the satellite positioned above your base, severing the link to your solar resource until another can be constructed. This will also occur if the Ix Research Centre ceases to be active (although it is self-powered). However the Solar Battery has a greater yield than either of the Wind Traps. As you move closer towards the poles, Solar Batteries become less effective. So at the equator, Solar Batteries used during a mission will have a very high output. Solar Batteries are useless during Night Missions, and in the shade. They are also vulnerable to any effect which will block their contact with the satellite. For example, a Solar Battery cannot absorb energy when covered by a Chameleon's Smoke Grenades.
- Unit Pre-requisite: (Solar Satellite at Ix Research Centre).
4. Geothermal Station
+ + + + + + + + +
Health: High Armour Type: Heavy Power: 500 Cost: 2000 Requires: Starport House: All [Commands]
- 1. Overdrive
- 2.
- 3.
- 4.
- 5.
- 6.
- 7. Repair
- 8. Stormsheath
- 9. Sell
[Traits]
- Geothermal Power: The Geothermal Station uses the tectonic forces of Arrakis' subterranean layers to produce a vast amount of energy. It produces a constant flow of power regardless of your position on Arrakis. Though it is the most effective power generator available, it should be employed with caution. The tectonic rods forced down through the crust will almost certainly cause violent earthquakes in the Station's local proximity if they are sufficiently mis-aligned by attack damage. Structures within a two cell radius from it will also be perpetually damaged by occasional ground tremors. Defend this installation with caution. Rarely, if the Geothermal Station is destroyed this tectonic activity can also cause lava flows to erupt into your base. Given the high cost and danger of this Structure, it is unlikely that a player will have more than one active at a time.
6. Harvesting
1. Refinery
+ + + + + +
Health: High Armour Type: Medium Power: -30 Cost: 1500 Requires: Wind Trap House: All [Commands]
- 1. Set Rally Point: Although this Unit factory has a Bib to accommodate produced Units, you can also set a Rally Point for this Structure. That is, by selecting this option, you can set a target location on the map that Units will move to when produced. This very useful ability will stop Units from cluttering the exit from the Unit factory, and can also be used to direct your Units to where they are currently needed, such as an area of your base in need of defence, or a skirmish in progress on the Battlefield. The Structure will produce Units at a slower rate if damaged or underpowered.
- 2. Add to Team 1-0: This is used to automatically assign produced Units to a specified team as soon as they are produced. Right-click on the icon to cycle through the Team numbers 1 to 0. Left click to toggle the Add To Team state on and off. When it is active, the border of the icon will glow, and this Team number will be shown over the Structure.
- 3. Upgrade to Advanced Refinery: A built Refinery can be upgraded to a more advanced version with this option.
- [4-6]. Unit Behaviour: The Aggression and Mobility commands, and a set of presets for these two settings, are used to control the default settings for Units produced from a factory. In other words, when a Unit emerges from this Structure, it will begin with the Behaviour settings specified here. For more information on how Behaviour operates, please refer to the appropriate section in the Interface document.
- 7. Repair
- 8. Stormsheath
- 9. Sell
[Build]
- Harvester: In addition to the Harvester included with the Refinery, it is also possible to call for Harvesters from off-screen in a similar manner. You will need to pay for its construction, and the display shows its current production status at the off-screen base. There is also a brief delay as the Harvester arrives and is dropped off by a Carryall, which makes this a slightly less effective method than purchasing Harvesters from the Vehicle Factory, but useful if a Vehicle Factory is not yet available. As Harvesters can often be devoured by Sandworms, the ability to replace them from the Refinery will be very useful.
[Traits]
- Refinery: The Refinery removes, processes and purifies Melange from unloaded Harvesters for use off-planet. You will be automatically credited for processed Spice, and the Spice will be transferred equally into your silos. A Harvester is included with the Refinery upon its construction. When a Harvester is unloading at a Refinery, it will be immune to harm. However, if the Refinery is captured, the unloading Harvester will also come under enemy control.
- Spice Storage (1000): The Structure is able to store a quantity of refined Spice (100 credits per pip), with a maximum capacity as shown. Stored Spice will be lost if the Structure is destroyed. It will not be transferred to the remaining Silos. When a Storage Structure is destroyed, its contents will be scattered over the surrounding area. The storage areas on these Structures are transparent so that the current capacity of the Silos can be visually seen. Capturing a Structure with Spice Storage transfers the Structure's contents and their monetary value to your account; destroying it deletes it from the owner's account. Damage to the Structure will decrease its storage capacity.
- Unit Pre-requisite (Harvester at Vehicle Factory; Carryall at Airbay).
2. Advanced Refinery
+ + + + + +
Health: High Armour Type: Medium Power: -30 Cost: 3000 Requires: Refinery (Upgrade) House: All [Commands]
- 1. Set Rally Point
- 2. Add to Team 1-0
- 3.
- [4-6]. Unit Behaviour
- 7. Repair
- 8. Stormsheath
- 9. Sell
[Build]
- Harvester
- Atreides Subterranean Harvester/Harkonnen Armed Harvester/Ordos Stealth Harvester/Corrino Suspensor Harvester
[Traits]
- Refinery: In exchange for a higher cost and greater risk from attack, the Advanced Refinery has two unloading bays, allowing a pair of Harvesters to unload simultaneously. It costs more than two individual Refineries, but has the same storage capacity in half the space. Improved purification procedures also ensure a higher yield from refined spice.
- Spice Storage (2000)
- Unit Pre-requisite (Harvester at Vehicle Factory; Atreides Subterranean Harvester/Harkonnen Armed Harvester/Ordos Stealth Harvester/Corrino Suspensor Harvester at Vehicle Factory; Carryall at Airbay).
3. Spice Silo
+
Health: Medium Armour Type: Light Power: -10 Cost: 150 Requires: Refinery House: All [Commands]
- 1. Upgrade to Advanced Silo: If you find yourself requiring additional storage capacity, but with limited space to build additional silos, you can upgrade existing silos to hold more spice.
- 2.
- 3.
- 4.
- 5.
- 6.
- 7. Repair
- 8. Stormsheath
- 9. Sell
[Traits]
- Silo: Once the storage capabilities of your Refinery have been depleted, you will need to begin to build Silos to store refined Melange. Be sure to remain aware of your remaining storage space: if you have insufficient Silos to store collected Spice, your produce will have to be discarded.
- Spice Storage (1500)
4. Advanced Silo
+
Health: Medium Armour Type: Light Power: -15 Cost: 300 Requires: Spice Silo (Upgrade) House: All [Commands]
- 1.
- 2.
- 3.
- 4.
- 5.
- 6.
- 7. Repair
- 8. Stormsheath
- 9. Sell
[Traits]
- Silo. This stacked version of the Silo permits twice the Spice storage in a single area, but at a greater risk. You could consequently lose twice as much spice if the silo is destroyed.
- Spice Storage (2000)
7. Surveillance
1. Command Outpost
+ + + + + +
Health: Medium Armour Type: Medium Power: -40 Cost: 750 Requires: Barracks House: All [Commands]
- 1. Upgrade to Sonar Outpost: The Atreides and Ordos can each upgrade their Command Outpost to equip it with a variety of radar-influencing effects and illusions, including the projection of solido fake Structures. Each of the two Houses has a unique set of effects.
- 2.
- 3.
- 4.
- 5.
- 6.
- 7. Repair
- 8.
- 9. Sell
[Build]
- Combat Drop (Requires Airbay and Barracks; recharges automatically at no cost; also available from Aircraft construction list)
[Traits]
- Communications Access: The Command Outpost is used to broadcast distant messages. An on-line Outpost allows you to communicate with other players during Multiplayer games, and activates the Alert Buttons on the Top Bar.
- Mini Map: The Command Outpost allows you to detect incoming Units and view the Battlefield as a whole. Full power is required to keep the Mini Map on-line. As the Outpost takes damage, the radar display will occasionally jitter or emit static, and will eventually periodically generate phantom Units.
- Stormsheath Controller: An on-line radar is also required for other Structures to activate or deactivate their Stormsheaths. When the Outpost reaches critical damage, or is destroyed, sold, or not fully powered, all Stormsheaths deactivate. You will not be able to activate any Stormsheaths until the Outpost is once again active. The solution, of course, is to have surplus power (and to defend your Outpost!).
- Unit Pre-requisite: (Surveillance Satellite at Ix Research Centre; Atreides Mobile Airbay at Vehicle Factory). This Structure must first be built before the given Unit is available for construction at the given Structure.
2. Atreides Sonar Outpost
+ + + + + +
Health: Medium Armour Type: Medium Power: -40 Cost: 200 Requires: Command Outpost (Upgrade) House: Atreides [Commands]
- 1. Duplicate: The Duplicate ability will create an exact copy of a targeted Unit, which the enemy will find visually indistinguishable from the real thing. It can be controlled like any other of your Units, except that attempting to use any of the Unit's abilities will have no true effects. A Unit would appear to open fire on an enemy, but would actually perform no damage, for example. The duplicate will vanish upon being shot by the enemy. To the player, duplicates will have a light blue tint to indicate that they are generated by the Atreides Sonar Tower. The ability has no effect on enemy Units, and drains two pips of energy from the Sonar Tower's battery.
- 2. Guise: The Guise ability will create an area of effect of four cell's radius from the target epicentre. Any player Units within this zone will be randomly assigned the appearance of another Unit type. This effect continues until the Unit leaves the generated zone, the effect on this area wears off, or the Unit performs an action other than moving. It will then revert to its original state. The Unit will retain the movement speed of its true form. Altered Units will morph between their true form and a dark blue-tinted version of the new form for the Atreides player, to indicate that this is not their true form. Other Units can also be moved into the zone and be effected by the Guise ability. This ability uses all six pips of Tower energy, and will last for the duration until the Sonar Tower has regenerated its energy level. If an enemy comes within sight range of an altered Unit, the enemy will see its true appearance as long as he maintains visual range. If the enemy Unit is an Infantryman, the altered Unit will be permanently unmasked unless it leaves the zone and returns, or the Guise sphere is re-applied. This ability only effects Atreides Units.
- 3. Reveal: The Reveal ability will permanently uncover a Shrouded area of four-cell radius. It will also grant true sight to this area for a few seconds, revealing any cloaked or camouflaged Units, and destroying anything illusory. This ability uses three pips of Tower energy.
- 4.
- 5.
- 6.
- 7. Repair
- 8.
- 9. Sell
[Build]
- Generate hologrammatic versions of any of the following Structures (a Structure of this type must already exist to be duplicated):
- Construction Yard
- Refinery
- Barracks
- Command Outpost
- Vehicle Factory
[Traits]
- Communications Access
- Corrupt Enemy Radar Data: This deceptive Structure corrupts enemy radar to create misinformation. A variety of abilities are available, as shown above.
- Energy Storage (6 pips): The Structure has a recharging power cargo level (of six pips) that is drained to generate any of these effects.
- Fake Structures: Finally, the Sonar Tower can be used to generate fake solido-projected Structures. A duplicate of an existing player Structure is created, so a true Structure must exist for a fake to be formed. If the parent Structure is lost, then the fake will also vanish. The generated Structure is indistinguishable from the real thing, at close range and on radar, and is tinted the colour of the player's House to distinguish between real and fake Structures. The effect has a limited range, so the Structure can only be generated within a ten tile radius of the Tower, and usual rules of terrain, distance, and occupied space must be obeyed. The Structure to place can be selected from the building list on the Sonar Tower as usual. The generation of such a Structure will require three pips of Tower energy, but once generated, the effect is permanent except when the Tower goes off-line due to power loss or damage, or the Structure is attacked by an enemy Unit.
- Mini Map
- Stormsheath Controller
3. Ordos Sonar Outpost
+ + + + + +
Health: Medium Armour Type: Medium Power: -40 Cost: 200 Requires: Command Outpost (Upgrade) House: Ordos [Commands]
- 1. Phantom: The Phantom ability generates a four-cell radius zone in the target area where a handful of random fake Ordos Units will appear on the enemy's radar. To the Ordos player these will be light green in colour. These Units will not be selectable by the player, and will remain immobile for the duration of this effect. They will vanish if seen by enemy Units. This ability uses all six pips of Tower energy, and will last for the duration until the Sonar Tower has regenerated its energy level.
- 2. Allegiance: The Allegiance ability changes the House colour of any enemy Units caught within the four-cell radius of this effect to that of House Ordos. To the Ordos player, the Units will have a darker shade of green to indicate that they do not actually belong to him. The enemy will continue to control these Units as normal, however automated defences will be fooled. The enemy's Units and turrets will automatically open fire on the green-coloured Units until they leave this zone or the effect over this area wears off. This ability uses all six pips of Tower energy, and will last for the duration until the Sonar Tower has regenerated its energy level. This ability operates only on enemy Units.
- 3. Radar Jam: The Radar Jam ability generates a four-cell radius zone in the target area that repels all incoming radar waves. In other words, all player Units and Structures in this area or that enter this area will be invisible to enemy radar. You will only be able to see the jammed Units by bringing a Unit in visual range. Essentially, all player Units and Structures in the zone will temporarily gain the Camouflage ability. Enemy Units are not effected. A particularly cunning strategy would be to employ this ability over the enemy's base, then execute an assault. Once the Units enter the Radar Jam zone, they will cloak, attacking under the cover of stealth. The ability uses three pips of Tower energy, and will last for the duration until the Sonar Tower has regenerated its energy level.
- 4.
- 5.
- 6.
- 7. Repair
- 8.
- 9. Sell
[Build]
- Generate hologrammatic versions of any of the following Structures (a Structure of this type must already exist to be duplicated):
- Construction Yard
- Refinery
- Barracks
- Command Outpost
- Vehicle Factory
- Airbay
[Traits]
- Communications Access
- Corrupt Enemy Radar Data
- Energy Storage (6 pips)
- Fake Structures
- Mini Map
- Stormsheath Controller
4. Ix Research Centre
+ + + + + + +
Health: Medium Armour Type: Light Power: 0 Cost: 1000 Requires: Command Outpost & Vehicle Factory House: All [Commands]
- 1.
- 2.
- 3.
- 4.
- 5.
- 6.
- 7. Repair
- 8. Stormsheath (Loses Satellites)
- 9. Sell
[Build]
- Weather Satellite
- Surveillance Satellite
- Solar Satellite
[Traits]
- Satellite Launching Facility: This facility is equipped to construct and launch invisible, non-controllable orbital satellites. Only one of each kind can, and need, be active for a House at a time. It is also a receiving station for data from launched satellites. A constant contact between satellite and Ix Research Centre is required to keep them in position. For this reason, the Ix Research Centre is self-powered. If the Ix Research Centre is destroyed or goes off-line or a storm breaks their contact, the satellites will drift out of orbit, never to be regained. Like the Solar Battery, if the Ix is obscured, for example by the Chameleon's smoke grenades, then contact is also severed, and you will not be able to build any replacement satellites until the obstruction has removed. The following Satellites can be constructed and launched:
- Weather Satellite: Provides early warning of approaching storms. Just before a storm appears on the mission map, you will receive a message such as "Warning: Weather Satellite Detects Storm Approaching from the North". This gives you some extra crucial time to prepare for the impending storm. Cost: $80.
- Surveillance Satellite: When this satellite is launched, it relays a complete view of the Battlefield, removing all Shroud (like the Red Alert GPS). A Command Outpost must first be constructed for this satellite to be available. The Satellite takes a little time to get in a correct position and run its program. After the launch, a one-minute countdown will start. When the countdown is finished, the whole sector will be revealed. Cost: $1000.
- Solar Satellite: This satellite is used in conjunction with the Solar Battery. The Battery cannot receive power for storage without this satellite. A Solar Battery is required for this satellite to be available. Cost: $150.
- Unit Pre-requisite:
- Scientist at Barracks
- Bene Gesserit (Atreides & Corrino) / Face Dancer / Spy at Upgraded Barracks
- Desolator at Vehicle Factory
- Deceptor at Vehicle Factory
- Chameleon / Dragon / Crippler / Suspensor Boat at Vehicle Factory
- Sandborer / Devastator / Deviator / Scorpion at Vehicle Factory
- Sonic Tank / Demolisher / Corroder / Vortex Tank at Vehicle Factory
- Falcon at Airbay
- Gargoyle at Airbay
- Wraith / Phoenix / Cobra / Corrino Wyvern at Airbay
- Electrosonic Pulse, Inferno, Nerve Gas or Neutron Tactical Missile.
8. Infantry Structures
1. Barracks
+ + + +
Health: Medium Armour Type: Medium Power: -20 Cost: 250 Requires: Wind Trap House: All [Commands]
- 1. Set Rally Point
- 2. Add to Team 1-0
- 3. Upgrade to Advanced Barracks: The Barracks must be upgraded to gain access to your House's Infantry Special Forces.
- [4-6]. Unit Behaviour
- 7. Repair
- 8. Stormsheath
- 9. Sell
[Build]
- All Basic Infantry Units:
- Light Infantry/Light Sardaukar
- Medium Infantry/Medium Sardaukar
- Atreides Heavy Infantry/Harkonnen Heavy Infantry/Ordos Heavy Infantry/Heavy Sardaukar
- Heavy Weapons Team
- Mortar Crew
- Mine Layer (Requires Repair Pad)
- Field Medic (Requires Hospital)
- Salvager (Requires Repair Pad)
- Scientist (Requires Ix Research Centre)
[Traits]
- Unit Pre-requisite (Trojan Personnel Carrier at Vehicle Factory; Corrino Mobile Barracks at Vehicle Factory; Aerial Troop Transport at Airbay).
2. Upgraded Barracks
+ + + +
Health: Medium Armour Type: Medium Power: -20 Cost: 200 Requires: Barracks (Upgrade) House: All [Commands]
- 1. Set Rally Point
- 2. Add to Team 1-0
- 3.
- [4-6]. Unit Behaviour
- 7. Repair
- 8. Stormsheath
- 9. Sell
[Build]
- All Infantry Units:
- Light Infantry/Light Sardaukar
- Medium Infantry/Medium Sardaukar
- Atreides Heavy Infantry/Harkonnen Heavy Infantry/Ordos Heavy Infantry/Heavy Sardaukar
- Heavy Weapons Team
- Mortar Crew
- Mine Layer (Requires Repair Pad)
- Fremen/Flamer/Marauder/Sniper
- Fedaykin Death Commando/Razer/Saboteur/Vaporiser
- Hookman/Enforcer/Assassin/Miner
- Sandrider/Hunter Seeker
- Field Medic (Requires Hospital)
- Salvager (Requires Repair Pad)
- Scientist (Requires Ix Research Centre)
- Bene Gesserit/Bene Tleilaxu/Spy (Requires Ix Research Centre)
[Traits]
- Unit Pre-requisite (Trojan Personnel Carrier at Vehicle Factory; Corrino Mobile Barracks at Vehicle Factory; Aerial Troop Transport at Airbay).
3. Corrino Training Compound
+ + + +
Health: Medium Armour Type: Medium Power: -20 Cost: 400 Requires: Upgraded Barracks House: Corrino [Commands]
- 1. Eject Unit: Clicking this command will cause a Unit to exit the Structure. The first Unit in will be the first one out. The most experienced Unit in the Compound (the Trainer) is the exception; he will always leave last.
- 2.
- 3.
- 4.
- 5.
- 6.
- 7. Repair
- 8. Stormsheath
- 9. Sell
[Traits]
- Storage (5 pips for Infantry Units inside the Structure)
- Training Area: House Corrino's elite Sardaukar forces can be further enhanced with on-site training facilities, ensuring that the Imperial Infantry far surpass those troops loyal to the Emperor's opponents. The Entry cursor appears over the Compound when an Infantry Unit (or a group of them) is selected. Click the mouse, and the Infantryman will enter the Compound. When inside, it is indicated by an additional full pip. The Unit inside that has the highest rank is designated the Trainer. Any other Units in the Compound will learn from the veteran, gradually gaining experience for as long as they are inside. The more Units that occupy the Compound, the slower their rate of development. Furthermore, it will cost a credit per Unit for every second that one of them is being trained. They cannot progress beyond the rank and experience of the Trainer. Once they reach it, they automatically exit the Compound.
4. Hospital
+ + + +
Health: Medium Armour Type: Light Power: -20 Cost: 600 Requires: Barracks House: All [Commands]
- 1.
- 2.
- 3.
- 4.
- 5.
- 6.
- 7. Repair
- 8. Stormsheath
- 9. Sell
[Traits]
- Healing: The Hospital serves as a centre for medical treatment of your Infantry Units, as well as a training centre for Medics. It is also equipped to heal the more critical injuries that are beyond treatment on the field. Any Infantry Units that enter the Hospital will be healed at no cost. Ailments that cannot be treated by the Field Medic such as the Plague or Radiation Sickness will be healed too. Only one Unit can be within the Hospital at a time, but healing is instaneous. Damage to the Hospital will decrease the rate of healing.
- Selling Infantry: To sell an Infantry Unit, click the Sell Cursor on the Unit, and it will enter the Hospital. You will then be refunded the Unit's value.
- Unit Pre-requisite (Medic at Barracks).
5. Repair Pad
+ + + + +
Health: Low Armour Type: Medium Power: -30 Cost: 800 Requires: Vehicle Factory House: All [Commands]
- 1.
- 2.
- 3.
- 4.
- 5.
- 6.
- 7. Repair
- 8. Stormsheath
- 9. Sell
[Traits]
- Repairing: The Repair Pad serves as a centre of maintenance for your mechanised Units. It is equipped to repair all Vehicles and Aircraft. However, a cost will be deducted for this privelege. Only one Unit can be on the Repair Pad at a time, and repairing is gradual. Repairing on the Repair Pad slows down with damage.
- Selling Vehicles: To sell a Vehicle or Aircraft, it must first be placed on the Repair Pad. Once this is done, click the Sell Cursor on the Unit. Or click the Sell Cursor on the Unit in the first place, and it will move onto the Repair Pad and be sold automatically.
- Unit Pre-requisite (Mine Layer at Barracks; Salvager at Barracks; Hyena Salvager Transport, Harkonnen Mobile Vehicle Factory & Mobile Construction Vehicle at Vehicle Factory).
6. Bunker
+ + + +
Health: High Armour Type: Very Heavy Power: 0 Cost: 200 Requires: Barracks House: All [Commands]
- 1. Set Rally Point
- 2. Release Units: The sandstorms of Arrakis can literally tear the skin from a person's bones. Anybody exposed to a storm without some form of protection is surely condemned to death. However the Bunker provides a glimmer of hope in these stinging maelstroms. Heavily armoured and able to withstand the mightiest of storms, the underground Bunker can protect up to twenty Infantry Units, or ten Vehicles. It is not effected by structural entropy, so will not require a foundation to begin at full health. In addition to storm protection, the underground shelter will also protect Units from harmful nuclear strikes (the building will hardly suffer any damage), although it would be best to keep them underground until the resulting fallout reaches a safe background level, otherwise they are likely to be infected with Radiation Sickness. It is also useful for surprise attacks on incoming enemy forces. The enemy may think that your base is lightly defended, but once his strike force comes within range, you could order your troops to leave the Bunker, and promptly a horde of battle-ready Units will be on hand to hold back the bewildered enemy.
- 3.
- 4.
- 5.
- 6.
- 7. Repair
- 8.
- 9. Sell
[Traits]
- Storage (20 pips for stored Units; Vehicles occupy two pips each)
9. Vehicle Structures
1. Vehicle Factory
+ + + + + +
Health: Medium Armour Type: Heavy Power: -30 Cost: 1000 Requires: Refinery House: All [Commands]
- 1. Set Rally Point
- 2. Add to Team 1-0
- 3.
- [4-6]. Unit Behaviour
- 7. Repair
- 8. Stormsheath
- 9. Sell
[Build]
- All Vehicles:
- Trike/Raider Trike/Corrino Trike
- Jeep/Corrino Jeep
- Quad/Corrino Quad
- Missile Tank/Deceptor (Requires Ix Research Centre)
- Desolator (Requires Ix Research Centre)
- AA Tank
- Tiger Tank
- Combat Tank
- Behemoth Tank
- Siege Tank
- Chameleon/Dragon/Crippler/Suspensor Boat (Requires Ix Research Centre)
- Sandborer/Devastator/Deviator/Leviathan (Requires Ix Research Centre)
- Sonic Tank/Demolisher/Corroder/Scorpion (Requires Ix Research Centre)
- Harvester (Requires Refinery)
- Subterranean Harvester/Armed Harvester/Stealth Harvester/Suspensor Harvester (Requires Advanced Refinery)
- Trojan Personnel Carrier (Requires Barracks)
- Hyena Salvager Transport (Requires Repair Pad)
- Atreides Mobile Airbay (Requires Command Outpost)
- Harkonnen Mobile Vehicle Factory (Requires Repair Pad)
- Ordos Mobile Starport (Requires Starport)
- Corrino Mobile Barracks (Requires Barracks)
- Mobile Construction Vehicle (Requires Repair Pad)
10. Aircraft Structures
1. Airbay
+ + + +
Health: Medium Armour Type: Light Power: -25 Cost: 700 Requires: Command Outpost House: All [Commands]
- 1. Set Rally Point
- 2. Add to Team 1-0
- 3.
- [4-6]. Unit Behaviour
- 7. Repair
- 8. Stormsheath (An Aircraft positioned on the landing pad when the Stormsheath is activated is also enclosed in the sheath)
- 9. Sell
[Build]
- All Aircraft:
- Light Ornithopter
- Medium Ornithopter
- Heavy Ornithopter
- Falcon (Requires Ix Research Centre)
- Gargoyle (Requires Ix Research Centre)
- Harkonnen Necromancer Hummingbird
- Ordos Concealer Hummingbird
- Corrino Silencer Hummingbird
- Carryall (Requires Refinery / Advanced Refinery)
- Aerial Troop Transport (Requires Barracks / Upgraded Barracks)
- Phoenix/Cobra/Wyvern (Requires Ix Research Centre)
[Traits]
- Airfield: If two Airbays are placed adjacent to one another, they become connected. If four Airbays are placed diagonally from one another, a control tower will appear at the core of the connection tubes. If an Airbay is vacant, and the built Aircraft is capable of landing, it will appear on the Airbay once produced. If not, then it will arrive from off-screen, and land nearby the Airbay if possible, or the Rally Point if you have set it.
- Restock (Payload of all Aircraft).
2. Starport
+ + + + +
Health: Medium Armour Type: Heavy Power: -40 Cost: 1500 Requires: Ix Research Centre House: All The Starport Interface is described in detail in the Interface section.
[Traits]
- Unit Pre-requisite (Ordos Mobile Starport at Vehicle Factory).
3. Missile Attack Centre
+ +
Statistics Property Value Property Value Health: Low Armour Type: Heavy Power: -300 Cost: 2000 Requires: Starport House: All The unique Missile Attack Centre Interface can be found described in detail in the Interface section.
11. Unbuildable Structures
1. Palace
+ + + + + + + + +
Health: Medium Armour Type: Heavy Power: -50 Cost: N/A Requires: N/A (Given in Missions) House: All [Commands]
- 1.
- 2.
- 3.
- 4.
- 5.
- 6.
- 7. Repair
- 8. Stormsheath
- 9.
[Build]
- Ornithopter Airstrike
[Traits]
- Mandatory Structure: You will be given this Structure at the start of certain Campaign Missions, usually those occurring at your principle House locations, such as Carthag or Arrakeen. You will fail your mission if this Structure is lost. As a result, it is also impossible to Sell this Structure. It costs no credits to repair this Structure.
2. Fremen Sietch
+ + + +
Health: Medium Armour Type: Medium Power: N/A Cost: N/A Requires: N/A House: Fremen [Commands]
A Sietch is never under player control, and therefore there are no command options.
[Traits]
- Sietch: This is a Fremen-owned Structure that can be found on certain Campaign maps. It can be seen as a subterranean cave mouth built into a cliff side. This is the equivalent of a Barracks for the Fremen, and can consequently build all three Fremen Units: Fremen Warrior, Fremen Naib, or Fremen Hookman. The Fedaykin Death Commando is the product of combined Fremen and Atreides training, so he only becomes available at the Sietch when the Fremen have become allied with the Atreides. The Fremen can build from these sietches without resource restrictions, as they do not harvest spice (this is their only Structure). In addition, the Fremen are experienced warriors, so all Fremen produced from the Sietch start automatically with at least Corporal rank. The Sietch will automatically recover from damage. The use of Sietches by the player depends on his association with the Fremen. If the Fremen are an enemy (if you are playing as Harkonnen for example), then the Sietch will produce Units and send them against you. Your best course of action would be to destroy the hostile Sietch. When the Atreides are still negotiating alliance with them, they have a neutral stance. You have convinced them to aid you, and they're willing to give you a chance, but they still don't trust you enough to ally. They cannot be controlled, but will engage your enemies in certain missions, much like the Mercenaries. That is, they will "build" units from a nearby sietch (or on occasion from off-screen "reinforcements"), that will go out without your intervention to destroy the enemy. However, less convinced Fremen factions might ignore your plight, expect tribute before they will offer aid, or even openly attack your own Units. Once allied with them, you can build the Fremen Units from your base, and Fremen Units produced from the Sietch will fight for you and protect your Units, and in some cases may even come under your control. There is an additional advantage to this alliance. Allied Units can be commanded to enter a Sietch. When they re-emerge, they will have been trained and rejuvenated by the Fremen, appearing at highest rank and maximum health. The Sietch has a cargo level of five pips for this. For each Unit that is maximised, a pip will be removed from the tally. These pips will recharge over time. However, if the Sietch is destroyed, it cannot be rebuilt, so it must be protected. If a group of Units are commanded to enter a Sietch, they will queue based on the Units with the least rank and experience entering first. Fremen may also permit you to shelter your Units in their Sietch in certain missions, whether from a fierce storm or in preparation for an ambush. While the Fremen do not generally have any resource considerations, in some missions, particularly where there is a high concentration of Sietch communities, a supply of water, provided by Wind Traps, is necessary to maintain the troops. A lack of Wind Traps will slow the production of Fremen Units from the Sietches. For example, in one Harkonnen mission you are commanded to remove Fremen presence from an area. There are a multitude of sietch entrances throughout the map. To have any hope of overthrowing the rapid flow of Fremen troops from the sietches, you must first destroy the arrays of Fremen-owned Wind Traps scattered about the map. This will reduce the production rate of the sietches, and allow you to destroy them. In an Atreides incarnation of this mission, you are expected to defend these water-collection sites to garner future assistance from the Fremen.
3. Smuggler Armoury
+ + + +
Health: Medium Armour Type: Medium Power: N/A Cost: N/A Requires: N/A House: Smugglers [Commands]
An Armoury is never under player control, and therefore there are no command options.
[Traits]
- Armoury: This is a Smuggler-owned Structure that can be found on certain Campaign maps, in Smuggler encampments. The Smugglers will fiercely protect their sands if necessary. Although Smuggler outposts are common, they are usually only equipped with harvesting facilities. However, some are better armed, and it is from these militaristic compounds that the Ordos' access to Mercenary troops is available. Once the Ordos have convinced the Smugglers to regain a rapport with them, the Ordos will be able to purchase Mercenary allies in some missions. Although the Ordos cannot control these forces, you can give them general orders. For example, selecting some of their Units, then clicking on an enemy Structure will cause the Mercenaries (presuming that they're in the mood) to wreak havoc in that general area. You can also suggest trends of tactics to follow. For example, tell them to focus on harvesting, or moving up the tech tree. Concentrate on defence, or reinforcing your own base and assisting your units, or sending strikes against the enemy. Or, assuming that they feel that the casualty count is in their favour, launch a full invasion with everything they've got. However, if you lose your Command Outpost, you will lose this ability to give orders, and they will have to act on their own discretion. You will need to ensure that the casualties of these treacherous hired guns do not grow too high and that their bases are adequately defended, or they will desert your cause. Mercenaries produce only the standard Unit types, although like the Smugglers, they are naturally invisible to radar. A flair for avoiding detection has helped the Smugglers to remain in operation for so long. Most armed outposts are also equipped with an Armoury. Like the Sietch, once the Ordos have regained their affiliation with the Smugglers, they can use this facility at no cost to upgrade their Units. As the Smugglers have complete access to the standard set of Units and Structures, they will be able to replace the Armoury when it is destroyed, and repair it if necessary, assuming that their harvesting is not impaired. If the Mercenaries defect, the Ordos will lose access to the Armoury. The Smugglers may also permit the use of this facility to other Houses, but usually for the price of some kind of service, or a financial donation. Treat them well, and they may provide reinforcements, financial support and assistance in later missions. The turncoat Smugglers may also provide reinforcements from their Starport or even stolen prototypes of House Units or entirely unique Ixian technology if they can be sufficiently persuaded.
4. Village
+ + + +
Health: Medium Armour Type: Medium Power: N/A Cost: N/A Requires: N/A House: Villagers [Commands]
Civilian Buildings not under player control, and therefore there are no command options.
[Traits]
- Garrison: Small settlements scattered over the planet house the dwellers of sink and graben, the ordinary inhabitants of Arrakis. Whether you attack or defend them effects your reputation with the civilian population, and whether or not they attack you on sight. Assuming that the villagers are not harmed in the conflict, it is possible to take refuge in their buildings. Up to eight Units can be garrisoned in a civilian Structure. When inside, they will gradually be healed by the inhabitants (unless the villagers are hostile, in which case they will take damage), and can use this refuge to hide, ambush, and protect themselves from the enemy. Villages can often be used as staging and replenishment stations without having to return to base to heal your damaged Units. Villagers can also sometimes provide valuable information about the enemy and your surroundings.
- Capture Benefits: Some civilian buildings, though they cannot be garrisoned, can be captured for your use. You get their functionality until they are blown up or captured by the enemy. For example, you can capture civilian power plants for extra energy, and treasuries to generate additional continuous funds.
![]()
END OF CHAPTER. Please click here to go to the next section, which will describe the Units that will be made available to you as you progress through the Melange Campaigns.
Copyright 2000 [ Stuart Walpole & Andrew Schuurman ] All Rights Reserved